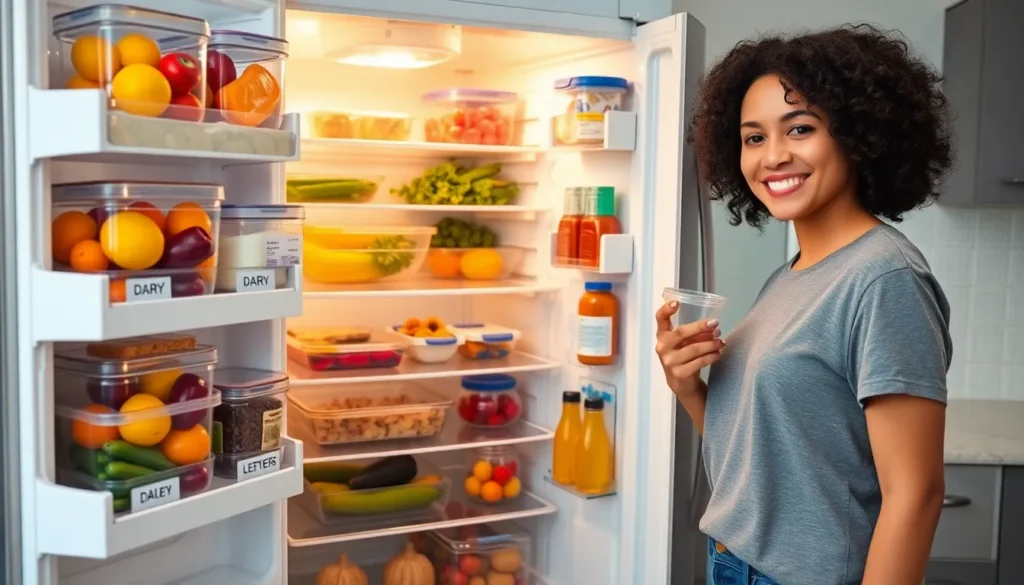
We’ve all been there – standing in front of an open refrigerator door frantically searching for that container of leftovers we know is somewhere behind the mystery jars and forgotten produce. A disorganized fridge doesn’t just waste time; it wastes money and leads to unnecessary food spoilage that could easily be avoided.
The good news? Transforming your chaotic refrigerator into an organized haven is simpler than you might think. With the right strategies and a few clever storage answers we’ll share today, you can maximize your fridge space while keeping everything visible and accessible.
Whether you’re dealing with a cramped apartment-sized refrigerator or a spacious family model, these practical organization ideas will help you create a system that actually works for your lifestyle. Let’s jump into the game-changing techniques that’ll turn your fridge from a black hole of forgotten food into an efficiently organized space you’ll actually enjoy using.
Clear Out and Clean Your Fridge Before Organizing
Starting with a clean slate transforms your fridge organization efforts from frustrating to effective. We can’t create an efficient system on top of expired food and grimy surfaces.
Remove All Items and Check Expiration Dates
Empty everything from your refrigerator completely before attempting any organization system. Pull out condiments, leftovers, produce, dairy products, and beverages to create a blank canvas for your new setup.
Check expiration dates on every single item as you remove them from the fridge. Toss anything that’s past its prime, including that yogurt from three weeks ago and those wilted vegetables hiding in the crisper drawer.
Sort items into three categories while you’re checking dates: keep, donate, and discard. Place items you’ll definitely use in the “keep” pile, unopened non-expired items you won’t use in the “donate” pile, and anything expired or spoiled in the “discard” pile.
Group similar items together on your counter during this process. Cluster all dairy products, condiments, leftovers, and produce separately to make the reorganization step much easier later.
Deep Clean All Shelves and Drawers
Remove all removable shelves and drawers from your refrigerator to clean them thoroughly. Most modern fridges have shelves and crisper drawers that lift out easily for washing.
Wash removable parts in warm soapy water using dish soap and a non-abrasive sponge. Rinse them completely and dry with a clean towel to prevent water spots and bacteria growth.
Soak stubborn sticky spots on shelves and drawers for 10-15 minutes before scrubbing. Use a paste made from baking soda and water for tough stains that won’t budge with regular soap.
Clean wire shelves with a soft brush to reach between the wires where crumbs and spills often hide. Pay special attention to the corners where debris tends to accumulate over time.
Wipe Down Interior Walls and Door Seals
Clean all interior walls using a mixture of two tablespoons of baking soda dissolved in one quart of warm water. This natural solution removes odors while safely cleaning food-contact surfaces.
Scrub door seals thoroughly with an old toothbrush dipped in the baking soda solution. These rubber gaskets trap crumbs, spills, and moisture that can lead to mold growth if left uncleaned.
Pay attention to the drip tray and vents located at the bottom and back of your fridge interior. These areas collect condensation and debris but often get overlooked during regular cleaning.
Dry all surfaces completely with a clean microfiber cloth before replacing shelves and drawers. Excess moisture can promote bacterial growth and create unpleasant odors in your freshly cleaned fridge.
Designate Specific Zones for Different Food Categories

Now that we’ve cleaned our fridge thoroughly, it’s time to create dedicated zones that’ll make finding items effortless and keep food fresh longer.
Create a Dairy and Eggs Section
Position your dairy and eggs in the center of your fridge where temperatures remain most consistent and coldest. We recommend using the middle shelf since it maintains the optimal temperature range for these perishable items.
Store milk cartons and yogurt containers toward the back of this zone where cold air circulates best. Keep cheese blocks and sliced varieties in clear containers so we can easily see what’s available without opening multiple packages.
Place eggs in their original carton rather than transferring them to door compartments. The carton protects eggs from absorbing odors and maintains their freshness longer when stored in the consistently cold center zone.
Organize butter and cream cheese in designated spots within this section, making morning routines smoother and baking projects more efficient.
Establish a Leftovers and Ready-to-Eat Zone
Create a prominent leftovers section at eye level on the front of a shelf to prevent forgotten meals from spoiling. This strategic placement ensures we’ll actually eat what we’ve prepared instead of letting it go to waste.
Use clear containers for all leftovers so we can quickly identify contents without opening lids. Glass containers work particularly well since they’re microwave safe and stack efficiently.
Label containers with dates using removable labels or dry erase markers to track freshness and prioritize which items need eating first. This simple step helps us rotate leftovers properly and reduces food waste.
Store pre-made snacks and grab-and-go items like cut vegetables, hummus, and prepared salads in this same zone for quick access during busy mornings or late-night snacking.
Set Up a Produce Storage Area
Separate fruits that produce ethylene gas like apples and pears from vegetables that are sensitive to this natural ripening agent. This separation prevents premature spoilage and extends the life of our fresh produce.
Store vegetables in the crisper drawers where humidity levels can be controlled to keep items like lettuce, carrots, and broccoli crisp and fresh. Most vegetables prefer higher humidity settings.
Keep fruits in breathable containers or perforated bags that allow proper air circulation while maintaining appropriate moisture levels. Berries and grapes particularly benefit from containers that prevent crushing while allowing airflow.
Place heartier vegetables like potatoes, onions, and garlic in a cooler section of the main fridge compartment if your crisper drawers are full, ensuring they stay fresh without taking up premium real estate.
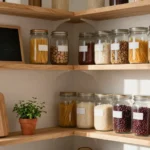
Utilize Clear Storage Containers for Better Visibility

We can transform our fridge organization by implementing clear storage answers that make every item instantly visible. This simple strategy eliminates the guesswork and helps us quickly identify contents without opening each container, eventually saving time and reducing food waste.
Invest in Stackable Airtight Containers
Stackable airtight containers offer us the perfect combination of freshness preservation and space efficiency. We should prioritize these containers for storing leftover food, snacks, and ingredients since they keep everything fresh while maximizing our limited fridge space. The stackable design allows us to create vertical storage towers that make the most of every inch available. These containers work particularly well for meal prep components, chopped vegetables, and portioned snacks that we want to grab quickly throughout the week.
Use Clear Bins for Small Items and Snacks
Clear bins become our secret weapon for taming the chaos of small items that typically scatter throughout the fridge. We can dedicate exact bins to condiments, spices, snack packs, and other tiny items that tend to get lost behind larger containers. This approach prevents clutter from taking over our organized zones and ensures that everything remains easily accessible. The transparency factor means we’ll never forget about that special sauce hiding in the back corner again.
Label Everything for Easy Identification
Labels serve as our roadmap to maintaining long term fridge organization and ensuring everyone in our household knows exactly where items belong. We can use custom labels, pre made options, or even a simple dry erase marker to mark each container and zone clearly. This system helps us maintain order even when we’re in a hurry to put groceries away. Everyone who uses the fridge will appreciate knowing exactly where to find what they need and where to return items after use.
Maximize Door Space with Strategic Placement

We often overlook our refrigerator door as valuable storage real estate. Transforming this area into an organized hub can significantly improve our kitchen efficiency.
Store Condiments and Sauces in Door Compartments
Door compartments work perfectly for condiments and sauces because these items handle temperature fluctuations better than perishable foods. We can safely store mustard, hot sauce, salad dressings, and barbecue sauce in these spaces without worrying about spoilage. Temperature variations that occur when opening and closing the door don’t affect these shelf-stable products as much as dairy or meat items.
Organizing condiments by height ensures we’re using every inch of available space efficiently. Taller bottles like ketchup and A1 sauce fit well in the upper door compartments, while smaller jars of jam or mustard work better in lower sections. Grouping similar items together creates a streamlined system that makes meal preparation faster and more enjoyable.
Keep Beverages in Door Bottle Holders
Bottle holders on the door provide the ideal solution for storing beverages while freeing up valuable shelf space inside our fridge. Water bottles, juice containers, and sports drinks fit securely in these designated areas and remain easily accessible throughout the day. We can quickly grab what we need without disturbing other items on the main shelves.
Strategic beverage placement also helps with weight distribution in our refrigerator door. Heavier items like large juice bottles should go in the bottom door compartments, while lighter beverages can occupy the upper sections. This arrangement prevents the door from becoming too heavy and ensures smooth operation of the hinges over time.
Use Door Space for Frequently Accessed Items
Frequently used items deserve prime real estate in our door storage system for maximum convenience. Ketchup, mayonnaise, and other daily condiments should occupy the most accessible spots at eye level where we can easily see and reach them. We save time during meal preparation when our go-to ingredients are immediately visible and within arm’s reach.
Creating a rotation system for frequently accessed items helps maintain freshness and prevents waste. Newer bottles and jars should go behind older ones, ensuring we use products before their expiration dates. We can also designate exact door compartments for different family members’ preferred items, making everyone’s favorites easy to locate during busy mornings or dinner preparations.
Implement the First In, First Out (FIFO) Method

The FIFO method serves as the foundation for efficient fridge management and significantly reduces food waste. This approach involves using older items before newer ones, a strategy that professional kitchens rely on for optimal stock management.
Place Newer Items Behind Older Ones
Positioning new groceries behind existing items creates an automatic rotation system. We recommend arranging shelves so older products stay easily accessible at the front. Taller items should go behind shorter ones to maintain clear visibility of all products. This simple placement strategy ensures we’ll naturally reach for items that need to be used first.
Visual organization makes the FIFO method effortless to maintain. When we can see everything in our fridge, we’re less likely to forget about items hiding in the back. Fresh produce benefits especially from this arrangement, as older vegetables and fruits move to the front where they catch our attention first.
Rotate Stock Regularly to Prevent Waste
Weekly rotation checks help us identify items approaching their expiration dates. We should scan our fridge contents regularly and move items that need immediate attention to prominent positions. This habit prevents forgotten foods from spoiling and saves money on grocery bills.
Active stock management reduces the risk of overlooked items turning bad. Moving older dairy products, leftovers, and produce to eye level positions ensures they get used before newer purchases. Research shows that regular rotation significantly decreases household food waste when implemented consistently.
Create a System for Tracking Purchase Dates
Labeling containers with purchase or preparation dates provides instant freshness information. We can use waterproof markers or removable labels to note when items entered our fridge. This tracking system works particularly well for leftovers, opened condiments, and prepared foods that lack clear expiration dates.
Organizing similar items together by use-by dates streamlines our meal planning process. Grouping dairy products, meats, and vegetables in designated bins makes it easier to monitor freshness across categories. Clear containers allow us to quickly assess what needs to be used soon, supporting both the FIFO method and efficient meal preparation.
Store Fruits and Vegetables in Optimal Conditions

Proper produce storage transforms your fridge organization and dramatically extends the life of your fruits and vegetables. We’ll maximize freshness while preventing costly spoilage through strategic placement and humidity control.
Keep Fruits in Crisper Drawers with Proper Humidity
Crisper drawers offer the perfect environment for storing fruits like strawberries and other moisture-loving produce. Most refrigerators feature adjustable humidity controls that we can customize based on what we’re storing.
Setting the humidity to high works best for strawberries, leafy greens, and other delicate fruits that wilt quickly. These items thrive in the controlled environment that crisper drawers provide.
Different fruits require different humidity levels to maintain their peak freshness. We recommend dedicating one drawer to high-humidity items and another to produce that prefers lower moisture levels.
Separate Ethylene-Producing Fruits from Sensitive Vegetables
Ethylene-producing fruits like apples and pears release natural gases that accelerate ripening in nearby produce. Keeping these items away from sensitive vegetables prevents premature spoilage and extends storage life.
Apples, bananas, and tomatoes are among the biggest ethylene producers in our fridges. We should store these items in separate compartments or drawers from lettuce, carrots, and other sensitive vegetables.
Strategic separation saves money by preventing entire batches of produce from going bad simultaneously. This simple organization technique can extend the life of sensitive vegetables by several days.
Use Produce Storage Bags to Extend Freshness
Produce storage bags maintain optimal humidity and gas exchange around our fruits and vegetables. These specialized bags help extend freshness by creating the perfect microenvironment for each type of produce.
Modern storage bags feature tiny perforations that allow proper airflow while retaining necessary moisture. We can significantly extend the life of leafy greens, herbs, and delicate fruits using these containers.
Different produce types benefit from different storage bag materials and designs. Some bags work better for high-moisture items, while others excel at preserving crispness in vegetables like carrots and celery.
Create a Meal Prep Station for Quick Access

Transform your fridge into a meal prep powerhouse by establishing a dedicated station that streamlines food preparation and access. We’ll create zones that support efficient cooking while reducing time spent searching for ingredients.
Dedicate a Shelf for Prepped Ingredients
Reserve one central shelf exclusively for meal components you’ve prepared in advance. Chopped vegetables, cooked grains, marinated proteins, and portioned snacks belong here for quick assembly during busy weekdays. Clear stackable containers maximize vertical space while providing visibility into contents without opening lids.
Position this prep shelf at eye level or on the most accessible middle shelf. We want ingredients like washed lettuce, diced onions, or cooked quinoa within easy reach when assembling meals. Label containers with contents and prep dates to track freshness and prevent waste.
Group similar prepped items together using bins or designated sections. Raw vegetables stay separate from cooked proteins, while grains and starches occupy their own container cluster. This system prevents cross contamination while making ingredient selection intuitive during meal assembly.
Store Grab-and-Go Meals at Eye Level
Place fully prepared meals at the most visible fridge location. Salad bowls, wrapped sandwiches, overnight oats, and portioned leftovers should occupy prime real estate where they can’t be forgotten or overlooked. Eye level placement encourages healthy choices by making nutritious options the most prominent.
Group all grab-and-go options in one designated zone. We recommend clustering these items together rather than spreading them throughout the fridge. This creates a natural “fast food” section that family members can access without disrupting other organized areas.
Use transparent containers or clear wrapping for immediate meal identification. Mason jars work perfectly for layered salads, while glass containers showcase colorful Buddha bowls or meal prep portions. Visibility eliminates guesswork and reduces time spent opening containers to check contents.
Keep Meal Components Together in Designated Areas
Establish exact zones for each food category within your meal prep station. Dairy products, beverages, produce, proteins, and condiments need distinct territories to prevent flavor transfer and maintain organization. This zoning approach mirrors professional kitchen organization for maximum efficiency.
Store beverages and tall bottles against the back wall of your prep area. Position shorter containers and meal components in front for easy access without moving items around. This height-based arrangement prevents toppling while maximizing shelf space utilization.
Use bins or labeled compartments to maintain category separation. Dedicate crisper drawers exclusively to fruits and vegetables, while condiments and sauces occupy door storage for frequent access. This systematic approach ensures meal components stay fresh while remaining easily accessible during food preparation.
Use Vertical Space with Stackable Solutions

We can transform our fridge’s efficiency by maximizing vertical space through strategic stacking answers. Clear, stackable containers help us identify contents quickly while preventing clutter throughout our refrigerator.
Install Additional Shelf Organizers
Adjustable shelves accommodate different container sizes and food items with remarkable flexibility. We can customize our storage space to fit tall bottles, wide containers, and various package shapes without wasting valuable real estate. Installing these organizers ensures efficient storage of items ranging from leftover containers to fresh produce packages. These flexible answers adapt to our changing grocery needs and seasonal storage requirements.
Stack Similar Items Using Risers
Risers and stepped shelves help us store similar items like jars and bottles in accessible layers. We can prevent items from getting lost at the back of shelves by creating tiered storage systems that bring everything into view. Organizing condiments, sauces, and preserves on risers makes grabbing what we need effortless during meal preparation. These elevated platforms work particularly well for grouping similar products by category or frequency of use.
Use Magnetic Storage on Fridge Sides
Magnetic hooks and bins attached to our fridge’s exterior sides provide additional storage without sacrificing interior space. We can store small items like spice containers, cooking oils, and frequently used condiments within easy reach. This approach keeps essential cooking ingredients accessible while freeing up valuable shelf space for larger items. External magnetic storage works especially well for items we use daily, creating a convenient cooking station right on our appliance’s surface.
Maintain Your Organized Fridge System

Maintaining our organized fridge system requires consistent habits and regular adjustments to keep everything running smoothly. Building these maintenance routines into our weekly schedule ensures our fridge stays efficient and hygienic long term.
Schedule Weekly Cleanouts and Reorganization
Weekly cleanouts form the foundation of effective fridge maintenance and prevent organizational systems from deteriorating over time. We should remove all items from our fridge and wipe down surfaces weekly to maintain proper hygiene standards. This regular cleaning routine eliminates bacteria buildup and keeps our food storage environment safe.
During each weekly session, we’ll discard expired foods and leftovers to free up valuable space and ensure our family’s safety. Checking expiration dates systematically prevents us from accidentally consuming spoiled items. Taking inventory during these cleanouts helps us track what needs to be restocked before our next grocery trip.
These weekly sessions also provide opportunities to reorganize items that may have shifted throughout the week. We can return misplaced items to their designated zones and ensure our storage system remains intact.
Adjust Storage Answers as Needed
Storage answers require periodic evaluation and adjustment to accommodate our changing needs and seasonal variations in food storage. We should assess our shelf heights and drawer liners regularly to prevent spills and accommodate different inventory sizes. Adjustable shelving allows us to maximize space efficiency as our storage needs evolve.
Adding or removing containers based on current requirements keeps our system flexible and functional. Seasonal changes often require different storage approaches, such as more produce containers during summer or additional holiday storage during winter months.
Using labels on containers and shelves helps designate exact zones and keeps everyone in our household informed about the organization system. Clear labeling prevents confusion and ensures family members can maintain the system consistently.
Keep an Inventory List for Shopping Efficiency
Maintaining a visible inventory list inside our fridge or on a nearby notice board streamlines our grocery shopping process and reduces food waste. This list should include both perishables and staple items to prevent overbuying and help us track what we actually need.
We’ll list current perishables and essential staples to avoid purchasing duplicates and reduce unnecessary food waste. This systematic approach to inventory management saves money and ensures we’re using what we already have.
Updating our inventory during weekly cleanouts and before grocery shopping keeps the list current and useful. Regular maintenance of this list transforms it into a powerful tool for efficient meal planning and budget management.
Conclusion
Transforming your refrigerator from chaotic to organized doesn’t require perfection—it requires consistency. We’ve covered everything from initial deep cleaning to strategic zoning and vertical storage answers that work with any fridge size.
The key to long-term success lies in maintaining these systems through weekly check-ins and adjusting as your needs evolve. Remember that small daily habits like following the FIFO method and keeping like items together will prevent you from starting over again.
Your organized fridge will save you money reduce food waste and make meal planning effortless. Start with one zone today and gradually carry out these strategies—your future self will thank you every time you open that door.
Frequently Asked Questions
How often should I clean out my refrigerator?
Schedule weekly cleanouts to maintain your organized system. During these sessions, discard expired items, reorganize misplaced products, and wipe down surfaces. This regular maintenance prevents odor buildup, reduces food waste, and keeps your fridge hygienic. Weekly cleanouts also help you stay aware of what you have, making grocery shopping more efficient and preventing duplicate purchases.
What is the FIFO method and how do I implement it?
FIFO stands for “First In, First Out” – using older items before newer ones to reduce food waste. Place new groceries behind existing items so older products are naturally used first. Label items with purchase dates and regularly check expiration dates during weekly cleanouts. This simple rotation system prevents food spoilage and saves money.
Where should I store different types of food in my refrigerator?
Create designated zones: store dairy and eggs in the center for consistent temperatures, keep leftovers and ready-to-eat items at eye level, and use crisper drawers for produce with proper humidity settings. Place condiments in door compartments and dedicate a central shelf for meal prep ingredients. This zoning system improves accessibility and food preservation.
How can I maximize storage space in a small refrigerator?
Use stackable airtight containers to utilize vertical space efficiently. Install adjustable shelf organizers and risers for tiered storage. Consider magnetic storage on the fridge’s exterior sides for small items. Clear containers help identify contents quickly, while proper grouping of similar items prevents clutter and maximizes every inch of available space.
What’s the best way to store fruits and vegetables?
Use crisper drawers with adjustable humidity settings – high humidity for leafy greens and low humidity for fruits. Separate ethylene-producing fruits (like apples) from sensitive vegetables to prevent premature spoilage. Consider specialized produce storage bags and avoid washing produce until ready to use. This proper storage extends freshness and reduces waste.
How do I maintain my organized refrigerator system long-term?
Establish consistent habits like weekly cleanouts, proper labeling, and immediate reorganization after grocery shopping. Keep a visible inventory list to track what you have and adjust storage solutions as your needs change. Stick to designated zones and the FIFO rotation method. Regular maintenance is key to preventing your fridge from returning to chaos.