We’ve all stood in our backyards wondering how to transform that empty patch of dirt into something spectacular. Whether you’re working with a sprawling industry or a tiny urban balcony, the right garden ideas can turn any outdoor space into your personal paradise.
Creating a beautiful garden doesn’t require a green thumb or unlimited budget – it just needs smart planning and creative vision. From vertical herb walls that maximize small spaces to drought-resistant rock gardens that thrive in any climate, we’ll show you how to design outdoor spaces that reflect your style while supporting local wildlife and reducing maintenance headaches.
The best gardens aren’t just pretty to look at – they’re functional ecosystems that provide food, attract beneficial insects, and create peaceful retreats from daily stress. Let’s explore innovative garden concepts that’ll make your neighbors stop and stare while keeping your weekends free from endless weeding and watering.
Create a Stunning Vegetable Garden Layout
Building upon our foundation of thoughtful garden planning, let’s explore how to design a productive vegetable garden that maximizes both harvest and visual appeal.
Choose the Right Location for Maximum Sunlight
Observing sunlight patterns across your yard reveals the best spots for vegetable production. Most vegetables need 6-8 hours of direct sunlight daily to thrive and produce abundant harvests.
Tracking shadows throughout the day helps us identify areas that receive consistent light exposure. We recommend checking your space at 9 AM, noon, and 3 PM to map sun and shade zones accurately.
Avoiding common obstacles like large trees, buildings, or fences prevents disappointing yields later. South-facing areas typically receive the most consistent sunlight in northern climates.
Testing soil drainage in sunny locations ensures your vegetables won’t sit in waterlogged conditions. We can perform a simple test by digging a hole 12 inches deep and filling it with water to see how quickly it drains.
Plan Your Garden Beds for Easy Access
Designing pathways between garden beds creates comfortable navigation during planting, weeding, and harvesting activities. We suggest making main paths 3 feet wide and secondary paths 18 inches wide for wheelbarrow access.
Limiting bed width to 4 feet allows us to reach the center from either side without stepping on planted areas. This width prevents soil compaction while maintaining efficient use of garden space.
Creating raised beds improves drainage and soil quality while reducing back strain during garden maintenance. Beds raised 8-12 inches provide excellent growing conditions for most vegetables.
Installing permanent edging defines bed boundaries and prevents grass from creeping into planted areas. Materials like cedar boards, stone, or metal edging create clean lines that enhance your garden’s appearance.
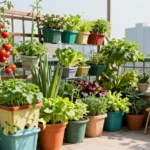
Select High-Yield Vegetables for Small Spaces
Growing vertical crops like pole beans, cucumbers, and indeterminate tomatoes maximizes production in limited square footage. These climbing varieties can produce 2-3 times more food than their bush counterparts.
Choosing compact varieties specifically bred for small spaces delivers impressive harvests from tiny plots. Cherry tomatoes, baby carrots, and mini bell peppers provide full-sized flavor in container-friendly packages.
Succession planting fast-growing crops like lettuce, radishes, and spinach extends your harvest season while making efficient use of garden real estate. We can plant new rows every 2-3 weeks for continuous production.
Interplanting compatible vegetables creates productive polycultures that maximize every inch of growing space. Pairing quick-growing lettuce with slower-developing broccoli allows us to harvest twice from the same area.
Design Beautiful Flower Border Ideas

Building on the foundation of a well-planned garden space, we’ll now explore how to create stunning flower borders that provide continuous beauty throughout the seasons.
Mix Perennials and Annuals for Year-Round Color
Combining perennials and annuals ensures your flower border maintains vibrant color from spring through fall. Perennials like peonies and daylilies return each year with reliable blooms, creating the backbone of your border design. Annuals such as petunias, impatiens, and marigolds fill gaps with intense seasonal color that you can change based on your preferences.
Strategic placement allows us to maximize this combination’s impact. We recommend planting perennials first as permanent fixtures, then filling spaces with annuals that complement the existing color palette. This approach gives us flexibility to experiment with new color combinations each growing season while maintaining consistent structure.
Create Height Variation with Layered Plantings
Layering plants of different heights transforms flat flower borders into ever-changing, three-dimensional displays. Tall plants like sunflowers or delphiniums create dramatic backdrops when positioned at the rear of the border. Mid-level options such as peonies, daylilies, and bee balm form the transition zone that connects tall and short elements.
Front-row plantings featuring creeping thyme, petunias, and low-growing perennials complete the layered effect. We suggest following the “thriller, filler, spiller” principle where tall plants serve as focal points, medium plants fill space, and trailing varieties spill over edges. This creates visual depth that makes even narrow borders appear more substantial and professionally designed.
Choose Color Schemes That Complement Your Home
Selecting colors that harmonize with your home’s exterior creates a cohesive industry design that enhances curb appeal. Cool colors including blues, purples, and whites produce calming effects that work exceptionally well with traditional or modern architectural styles. These combinations create sophisticated borders that feel serene and elegant.
Warm colors featuring yellows, oranges, and reds add energy and warmth that complements rustic or Mediterranean-style homes perfectly. We can also create striped flower borders by planting flowers in alternating colors for dramatic visual impact. Simple impatiens flower borders work particularly well in shaded areas where their vibrant colors shine against darker backgrounds, proving that effective color schemes adapt to both sun and shade conditions.
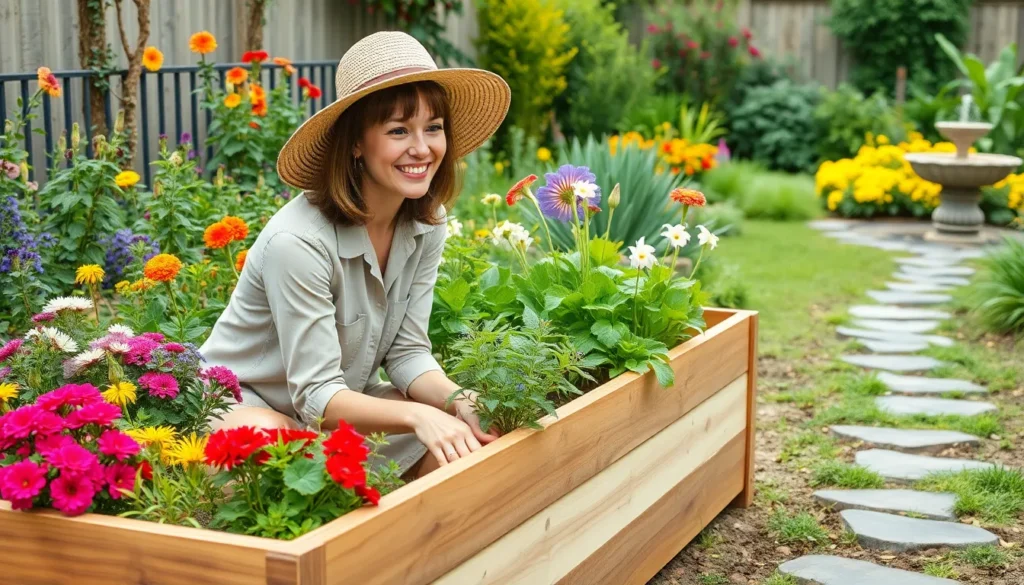
Build Raised Garden Beds for Better Growing

We’ll transform your gardening experience by constructing raised beds that deliver superior drainage and healthier plants. These elevated growing spaces solve common soil problems while making garden maintenance easier on your back.
Select Durable Materials for Long-Lasting Beds
Untreated cedar stands out as our top choice for building raised beds due to its natural resistance to rot and insects. This material withstands various weather conditions without requiring chemical treatments that could harm your plants. Brick offers another excellent option for gardeners seeking a permanent, weatherproof solution that maintains its appearance for decades. Corten steel provides a modern aesthetic while delivering exceptional durability against harsh outdoor elements.
We recommend avoiding pressure-treated lumber containing chemicals that may leach into soil over time. Natural materials like untreated cedar cost more initially but save money in the long run by lasting years longer than cheaper alternatives.
Determine Optimal Bed Height and Width
Height requirements start at a minimum of six inches, though we strongly recommend 18 to 24 inches for optimal plant performance. This height range allows complete root development for most vegetables and flowers while providing superior drainage compared to ground-level gardens. Deeper beds also reduce bending and kneeling during planting and harvesting activities.
Width should never exceed what you can comfortably reach from both sides of the bed. We suggest keeping beds between 3 to 4 feet wide to ensure easy access to all plants without stepping on soil. This measurement allows most gardeners to reach the center from either side while maintaining good soil structure.
| Measurement | Minimum | Recommended | Maximum |
|---|---|---|---|
| Height | 6 inches | 18-24 inches | 36 inches |
| Width | 2 feet | 3-4 feet | 4 feet |
Fill Beds with Quality Soil Mix
Quality soil mix combines topsoil, compost, and drainage materials like perlite or vermiculite for optimal plant growth. This blend provides essential nutrients while preventing water from pooling around plant roots. We avoid using regular garden soil in raised beds because it compacts easily and restricts root development.
Commercial bagged soil mixes designed specifically for raised beds offer convenience and consistent quality. Alternatively, we create custom blends using one-third each of topsoil, compost, and coarse material for drainage. Adding organic matter annually maintains soil structure and continues feeding beneficial microorganisms that support plant health.
Install Water Features for Garden Ambiance

Water features transform our outdoor spaces into tranquil retreats while supporting local wildlife and sustainable garden practices.
Add a Small Fountain for Soothing Sounds
Installing a small fountain creates continuous, peaceful sounds that enhance our garden’s atmosphere. These versatile features serve as stunning focal points that capture attention through both visual appeal and gentle water sounds. We can choose from various fountain sizes and styles to match our garden’s existing design elements.
Modern fountains come in materials like natural stone, ceramic, or metal finishes that complement different industry themes. Placement near seating areas maximizes the relaxation benefits of flowing water sounds. Electric fountains require nearby power sources, while solar options offer eco friendly alternatives for sunny locations.
Create a Simple Rain Garden for Sustainability
Building a rain garden provides an eco friendly solution for managing stormwater runoff while promoting environmental sustainability. These shallow depressions collect and filter rainwater from rooftops, driveways, and other hard surfaces that don’t absorb water naturally. Rain gardens reduce water pollution, help recharge groundwater, and create valuable habitat for native wildlife.
Designing effective rain gardens involves selecting locations that receive natural water flow during storms. We need proper soil composition and drainage to ensure water infiltration without creating soggy conditions. Native grasses and flowering perennials work best because they withstand both saturated and dry soil conditions throughout different seasons.
Rain gardens can be customized in various sizes and shapes to fit our available space and personal preferences. Successful installations require plants that thrive in wet conditions during storms but tolerate drought between rain events.
Build a DIY Bird Bath to Attract Wildlife
Constructing a DIY bird bath offers a straightforward way to attract birds and other wildlife to our garden spaces. Bird baths provide essential water sources for drinking and bathing, especially during dry periods when natural water becomes scarce. We can use materials like terra cotta, natural stone, or repurposed household items to create unique designs that reflect our personal style.
Strategic placement considers visibility for wildlife watching while ensuring safety from predators like cats. Birds prefer shallow water depths of 1 to 2 inches with textured surfaces that provide secure footing. Positioning bird baths near shelter like shrubs or trees gives birds quick escape routes when needed.
Regular cleaning and fresh water changes keep our bird baths healthy and attractive to visiting wildlife. Adding small stones or branches creates landing spots and drinking perches for different bird species.
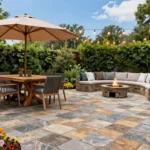
Create Cozy Seating Areas in Your Garden

Building comfortable outdoor spaces extends your living area into nature while providing perfect spots for relaxation and entertainment. We’ll explore how to design inviting seating areas that transform your garden into a personal retreat.
Design a Peaceful Reading Nook Among Plants
Choosing a quiet corner away from foot traffic creates the perfect foundation for your reading sanctuary. We recommend selecting a shaded balcony or secluded garden spot where you can enjoy uninterrupted quiet time with your favorite books.
Installing comfortable seating designed for extended use makes all the difference in your reading experience. Wooden benches, hammocks, or cushioned outdoor chairs provide the support you need for long reading sessions while withstanding weather conditions.
Surrounding your nook with lush greenery and fragrant plants creates a naturally calming atmosphere. Lavender, jasmine, and other aromatic flowers fill the air with pleasant scents while potted plants add layers of green texture around your seating area.
Adding thoughtful accessories enhances both comfort and functionality in your reading space. Soft outdoor textiles, a small side table for beverages and books, plus ambient features like bird feeders or water fountains create soothing background sounds that enhance your reading experience.
Build a Fire Pit Area for Evening Gatherings
Selecting a safe location forms the foundation of any successful fire pit installation. We always choose level, open areas positioned well away from overhanging branches and flammable structures to ensure everyone’s safety during evening gatherings.
Using durable materials like stone, brick, or metal ensures your fire pit withstands years of use. These weather resistant options provide both safety and style while requiring minimal maintenance throughout the seasons.
Arranging seating in a circle around your fire pit encourages conversation and creates an intimate gathering space. Built in benches or movable outdoor chairs positioned at comfortable distances allow guests to enjoy the warmth while socializing easily.
Installing ambient lighting extends your fire pit’s usability into the darker hours. String lights, decorative lanterns, and solar pathway lights provide both safety illumination and magical atmosphere for your evening entertainment area.
Install Garden Benches Along Walking Paths
Positioning benches at strategic intervals along your garden paths creates natural rest stops during leisurely strolls. We recommend placing seating at scenic viewpoints or every 50 to 75 feet to encourage visitors to pause and appreciate your garden’s beauty.
Selecting bench designs that complement your garden’s existing style maintains visual harmony throughout your outdoor space. Rustic wooden benches suit cottage gardens while sleek metal designs work perfectly in contemporary landscapes.
Choosing weather resistant materials ensures your path seating remains beautiful and functional year round. Teak, powder coated aluminum, and treated hardwoods resist moisture damage while requiring minimal upkeep to maintain their appearance.
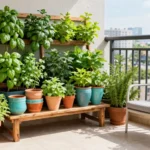
Incorporate Vertical Growing Solutions

Maximizing garden space becomes effortless when we embrace vertical growing techniques that transform walls, fences, and structures into productive growing areas.
Use Trellises for Climbing Plants and Vines
Trellises provide essential support for climbing plants like clematis, climbing hydrangea, and trumpet vines while adding structural beauty to our garden designs. We can construct these vertical supports from various materials including wood, metal, and willow, each offering unique aesthetic appeal and durability benefits.
Climbing plants thrive when we select varieties such as star jasmine, bougainvillea, and climbing roses for their fragrant displays and visual impact. Obelisk trellises work particularly well in container gardens, providing sturdy pyramid-like structures that support climbing plants in limited spaces.
Material selection affects both longevity and garden style, with cedar offering natural weather resistance while metal trellises provide modern architectural lines. Installation positioning near existing structures maximizes growing potential while creating natural privacy screens and focal points.
Install Wall-Mounted Planters for Small Spaces
Wall-mounted planters transform vertical surfaces into productive growing areas, making them ideal answers for patios, balconies, and compact garden spaces. We can use these space-saving systems to grow herbs, flowers, and small vegetables without sacrificing valuable ground space.
Placement strategies involve mounting planters at comfortable heights for easy maintenance while ensuring adequate sunlight exposure throughout the day. Drainage considerations become crucial when selecting wall-mounted systems, as proper water management prevents structural damage and plant health issues.
Plant selection works best with lightweight varieties that won’t strain mounting hardware, including herbs, succulents, and trailing flowers. Modular designs allow us to expand our vertical gardens gradually while maintaining visual cohesion across the entire wall surface.
Create Living Walls with Modular Systems
Living walls use interlocking modular systems to create lush vertical gardens that improve air quality while providing natural insulation benefits. We can design these green walls using specialized units that accommodate various plant types and growing conditions.
Modular components connect seamlessly to form continuous growing surfaces that adapt to different wall sizes and architectural features. Plant diversity thrives in these systems, allowing us to combine flowering plants, foliage varieties, and even small vegetables in organized growing patterns.
Installation benefits include improved building insulation, enhanced air quality, and dramatic visual impact that transforms ordinary walls into living art pieces. Maintenance access remains straightforward with properly designed systems that include built-in irrigation and easy plant replacement capabilities.
System expansion allows us to start small and gradually increase coverage as our confidence and plant collection grows over time.
Add Lighting to Enhance Garden Beauty

Garden lighting transforms outdoor spaces into enchanting evening retreats while extending the usable hours of our gardens. Strategic illumination creates visual depth and highlights the natural beauty we’ve worked so hard to cultivate.
Install Solar Path Lights for Safety and Style
Solar path lights provide practical illumination for walkways without increasing energy bills. These fixtures charge during daylight hours and automatically illuminate pathways after dark, ensuring safe navigation through garden spaces. Installation requires no electrical wiring, making them perfect for DIY garden projects.
We recommend spacing solar lights 6 to 8 feet apart along walking paths for optimal coverage. Choose models with LED bulbs for brighter light and longer battery life. Position them slightly offset from the path center to create visual interest while maintaining functionality. Quality solar lights typically provide 8 to 10 hours of illumination on a full charge.
Hang String Lights for Magical Evening Atmosphere
String lights create enchanting ambiance that transforms gardens into magical outdoor living spaces. Edison bulb string lights offer vintage charm with warm, golden illumination that complements natural garden elements. Mercury ball string lights provide a more modern aesthetic with consistent, bright lighting.
We suggest draping string lights along trellises, pergolas, or fence lines for maximum visual impact. Wrap them around tree trunks and branches to create stunning focal points that draw the eye upward. Connect multiple strands to cover larger areas, ensuring adequate spacing between bulbs for even light distribution. Weatherproof outdoor string lights withstand seasonal elements and provide years of reliable performance.
Use Spotlights to Highlight Special Plants
Spotlights create dramatic focal points by emphasizing exceptional plants and garden features. Adjustable LED spotlights allow precise control over light direction and intensity, enabling us to showcase prized specimens effectively. Backlighting potted trees produces a warm glow that creates striking silhouettes against walls or fences.
Position spotlights at ground level to illuminate ornamental grasses and architectural plants from below. This upward lighting technique creates dramatic shadows and emphasizes plant texture and form. Use multiple spotlights at different angles to eliminate harsh shadows and create even coverage. Low voltage LED spotlights consume minimal energy while providing brilliant illumination that lasts throughout the night.
Design Pathways and Garden Walkways

Well-designed pathways connect all your garden elements while guiding visitors through your carefully planned outdoor space. Garden walkways create structure and flow that enhance both functionality and visual appeal.
Choose Materials That Match Your Garden Style
Mulch pathways offer the most economical solution for informal garden settings. These eco-friendly paths require minimal maintenance aside from occasional topping up and complement natural landscaping beautifully. Installation takes just a few hours and costs significantly less than hardscaping options.
Gravel walkways provide excellent drainage while maintaining affordability and ease of installation. Water permeates through gravel surfaces, reducing runoff and preventing erosion around your planted areas. Regular topping up maintains their appearance, but the overall maintenance remains minimal compared to other materials.
Brick and paver pathways create either traditional charm or modern sophistication depending on your chosen design and layout patterns. These durable materials withstand heavy foot traffic and weather conditions for decades. Higher upfront costs get offset by their longevity and ability to increase property value.
Natural stepping stones blend seamlessly into planted areas while providing defined walking surfaces. These materials work particularly well when combined with mulch or gravel pathways to create varied textures throughout your garden design.
Create Curved Paths for Natural Flow
Meandering curves guide visitors through different garden sections in a harmonious and exploratory manner. Curved pathways create natural sight lines that reveal new garden features around each bend. This design approach makes even small gardens feel larger and more mysterious.
Strategic placement of curves helps connect various garden rooms and focal points without creating abrupt transitions. Each curve should have a purpose, whether directing attention to a special plant, water feature, or seating area. Gentle curves feel more natural than sharp angles in most garden settings.
Visual rhythm develops when curves follow the natural contours of your industry and existing plant groupings. Pathways that work with rather than against your garden’s natural flow create seamless integration between hardscape and softscape elements.
Add Stepping Stones Through Planted Areas
Strategic placement of stepping stones protects surrounding plants from foot traffic while creating access to garden beds. These elements allow you to tend plants, harvest vegetables, or simply enjoy close up views without damaging root systems or compacting soil.
Visual interest increases when stepping stones punctuate planted areas with contrasting textures and colors. Natural stone, concrete pavers, or even recycled materials can serve as functional art pieces within your garden composition. Spacing them 18 to 24 inches apart accommodates comfortable walking rhythm.
Combined materials work effectively when stepping stones connect to main pathways made from mulch or gravel. This layered approach creates depth and guides visitors naturally from primary walkways into intimate garden spaces. Proper installation ensures stones remain level and stable over time.
Plan a Pollinator-Friendly Garden Space

Creating a pollinator friendly garden transforms our outdoor spaces into thriving ecosystems that support local wildlife while providing continuous beauty throughout the growing seasons. We’ll design these gardens using native plants and strategic layouts that maximize space and visual appeal.
Plant Native Flowers to Support Local Wildlife
Native wildflowers like coneflowers and black-eyed Susans form the foundation of our pollinator garden design. We recommend selecting three native plant species for each growing season to ensure continuous blooms from spring through fall. Regional native plants attract local pollinators more effectively than non-native varieties because they’ve evolved together over thousands of years.
Layered arrangements from tall to short maximize our garden space while creating stunning visual depth. Warm colors including red, orange, and yellow draw in exact pollinators, while cool tones like purple and blue attract different species. Diverse flower shapes and sizes accommodate various pollinator types, from tiny native bees to large butterflies.
Create Butterfly Gardens with Exact Plant Choices
Nectar plants such as zinnias and coneflowers provide essential food sources for adult butterflies throughout their active seasons. We position these flowering plants in sunny locations where butterflies can easily access the blooms while warming themselves in the morning sun.
Host plants like milkweed serve a dual purpose by feeding butterfly caterpillars and supporting complete life cycles. Butterfly gardens require both nectar sources and larval host plants to create sustainable populations. Strategic placement of host plants near nectar sources reduces energy expenditure for female butterflies seeking egg-laying sites.
Establish Bee-Friendly Herbs and Wildflowers
Clustered plantings of the same species like lavender or borage help efficient foraging patterns for bees. We plant these herbs in groups of at least three to five plants to create substantial nectar sources that bees can easily locate and remember.
Nesting sites for ground-nesting bees require areas of bare soil and uncut hollow stems throughout winter months. Native bee species need diverse habitat features beyond just flowering plants to complete their reproductive cycles. We leave small patches of undisturbed soil and avoid cutting all plant stems in fall to provide overwintering sites for beneficial insects.
Organize Tool Storage and Garden Sheds

Efficient organization transforms cluttered garden sheds into functional workspaces that support our gardening activities throughout the seasons. Creating organized storage systems helps us maintain our tools while maximizing the available space in our sheds.
We’ll start by installing adjustable shelving systems that accommodate different sized items like lawn equipment and gardening supplies. Free standing metal shelving units work exceptionally well for storing bins and containers while offering the flexibility to reconfigure our storage layout as needs change.
Hanging tools on hooks and pegboards keeps them accessible while freeing up valuable floor space for larger equipment. Utilizing overhead space with ceiling mounted storage answers maximizes our shed’s vertical capacity and creates room for seasonal items we don’t access frequently.
Build Custom Storage for Garden Equipment
Custom storage answers allow us to design systems specifically customized to our unique collection of garden equipment and tools. Built in cabinets with doors provide secure storage for smaller items like seeds, fertilizers, and hand tools while protecting them from dust and moisture.
Wooden crates offer versatile storage options that we can stack and rearrange based on seasonal needs. These crates work particularly well for storing larger items like hoses, watering equipment, and gardening tools that need easy access during growing season.
Constructing dedicated spaces for lawn mowers and wheelbarrows prevents damage while keeping walkways clear. Custom built compartments ensure each piece of equipment has its designated place, making it easier to maintain our tools and locate items quickly.
Create Potting Bench Areas for Easy Planting
Dedicated potting bench areas streamline our planting processes by providing organized workspaces equipped with all necessary supplies. Including a durable work surface made from wood or metal creates a stable foundation for transplanting seedlings and preparing containers.
Adding storage drawers beneath the work surface keeps potting supplies, plant labels, and small tools within arm’s reach. These integrated storage answers eliminate the need to search for materials while working on planting projects.
Installing shelving above the potting bench creates additional storage for frequently used items like pots, soil amendments, and watering supplies. Good lighting in the potting area ensures we can work comfortably during early morning or evening garden sessions.
Design Compost Systems for Garden Waste
Effective composting systems transform our garden waste into valuable soil amendments while reducing the volume of materials we need to dispose of elsewhere. Compost bins with enclosed designs keep pests out while maintaining a clean environment around our storage areas.
Worm composting systems offer excellent answers for small scale composting of kitchen scraps and garden debris. These compact systems fit easily into corner spaces and produce nutrient rich castings that dramatically improve our soil quality.
Three bin composting systems allow us to maintain continuous compost production by rotating materials through different stages of decomposition. This approach ensures we always have finished compost available while processing new organic materials throughout the growing season.
Conclusion
We’ve explored countless ways to transform your outdoor space into a thriving garden sanctuary that reflects your unique style and supports local ecosystems. From vertical growing answers and water features to pollinator-friendly plantings and efficient storage systems these ideas prove that beautiful gardens are achievable regardless of your space size or budget.
The key to success lies in thoughtful planning and embracing creative answers that work for your exact needs. Whether you’re drawn to productive vegetable beds raised garden systems or enchanting flower borders remember that every garden tells a story and yours should reflect your personal vision.
Start with one or two ideas that excite you most and build from there. Your garden journey doesn’t need to happen overnight but with patience and creativity you’ll soon have an outdoor space that brings joy relaxation and natural beauty to your daily life.
Frequently Asked Questions
What are some creative garden ideas for small outdoor spaces?
Vertical herb walls, drought-resistant rock gardens, and wall-mounted planters are excellent options for small spaces. These solutions maximize growing area while creating functional ecosystems. You can also use trellises for climbing plants and create living walls with modular systems to enhance both aesthetics and productivity in compact areas.
How do I choose the best location for a vegetable garden?
Select a spot with maximum sunlight exposure, ideally 6-8 hours daily. Observe sunlight patterns throughout the day and avoid areas with obstacles like trees or buildings that could block light. Ensure easy access for maintenance and consider proximity to water sources for convenient irrigation.
What’s the ideal size for raised garden beds?
Raised beds should be 18-24 inches high for optimal root development and 3-4 feet wide for easy access from both sides. This allows you to reach the center without stepping into the bed, preventing soil compaction while reducing strain during maintenance tasks.
How can I create year-round color in my flower borders?
Mix perennials and annuals strategically, with perennials forming the backbone and annuals filling seasonal gaps. Layer plants by height to create depth and choose color schemes that complement your home’s exterior. This approach ensures vibrant blooms from spring through fall.
What materials work best for building raised garden beds?
Use durable, safe materials like untreated cedar, brick, or corten steel for longevity. Avoid pressure-treated lumber due to potential chemical leaching into soil. Fill beds with quality soil mix combining topsoil, compost, and drainage materials, adding organic matter annually for optimal plant health.
How do I attract pollinators to my garden?
Plant native wildflowers like coneflowers and black-eyed Susans, selecting three native species for each growing season. Create butterfly gardens with both nectar and host plants, and establish bee-friendly herbs in clustered arrangements. Provide nesting sites for ground-nesting bees to support sustainable populations.
What are the benefits of adding water features to gardens?
Water features like fountains provide soothing sounds and visual appeal while supporting local wildlife. Rain gardens help manage stormwater runoff eco-friendly, while DIY bird baths attract birds. These elements enhance garden ambiance and create sustainable ecosystems that benefit both aesthetics and environment.
How can I maximize vertical growing space in my garden?
Install trellises for climbing plants and vines, use wall-mounted planters for herbs and flowers, and create living walls with modular systems. These solutions improve air quality, provide insulation, and allow diverse plant combinations while making efficient use of limited horizontal space.
What lighting options work best for garden enhancement?
Solar path lights provide safety and style with optimal 6-8 foot spacing. String lights create magical atmosphere when hung between trees or structures. Use spotlights to emphasize special plants and features, positioning them at ground level for dramatic upward lighting effects that extend garden enjoyment into evening hours.
How do I design effective garden pathways?
Choose materials based on your garden style: mulch for informal settings, gravel for drainage, or brick/pavers for durability. Create meandering curves to guide visitors naturally and add stepping stones for plant protection and visual interest. Pathways should connect garden elements while enhancing functionality and appeal.
What’s the best way to organize garden tools and storage?
Install adjustable shelving systems and use pegboards to hang tools, keeping them accessible while freeing floor space. Create dedicated potting bench areas with good lighting and storage for supplies. Consider custom solutions like built-in cabinets and wooden crates for tailored organization of garden equipment.
How do I start composting in my garden?
Choose between compost bins for general organic waste or worm composting systems for kitchen scraps. Three-bin systems allow continuous compost production by rotating materials through different decomposition stages. This recycling approach reduces waste while creating nutrient-rich soil amendment for healthier plants.