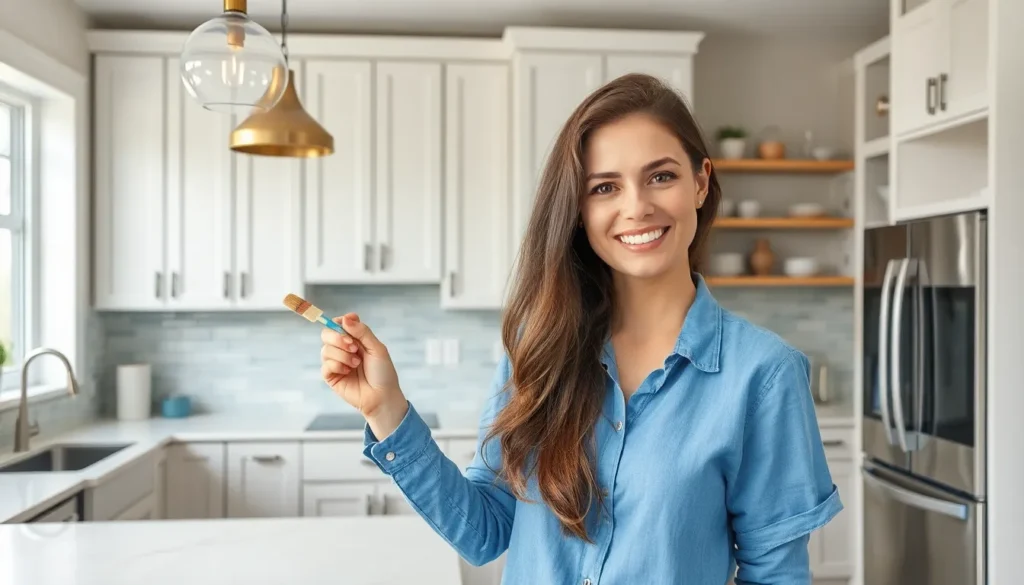
We’ve all stood in our kitchens wondering how to transform the heart of our home without very costly. Whether you’re dealing with outdated cabinets, cramped counter space, or appliances that have seen better days, a kitchen makeover doesn’t have to mean a complete gut renovation.
Smart kitchen updates can dramatically change your space’s look and functionality while staying within budget. From simple cabinet refreshes and modern lighting upgrades to strategic storage answers and trendy backsplash designs, we’ll show you how small changes create big impact.
The best part? Many of these groundbreaking ideas are perfect DIY kitchen projects that you can tackle over a weekend. We’ve compiled proven strategies that interior designers use to maximize both style and efficiency, helping you create the kitchen you’ve always wanted without the designer price tag.
Paint Your Cabinets for an Instant Transformation
Cabinet painting delivers one of the most dramatic kitchen transformations you can achieve for under $200. We’ve seen homeowners completely revolutionize their spaces by simply updating cabinet colors instead of replacing entire units.
Choose the Right Paint Type for Kitchen Cabinets
Acrylic latex paint works best for most kitchen cabinet projects because it resists moisture and cleans easily. We recommend using semi-gloss or satin finishes since they handle daily wear better than flat paints.
Oil-based paints provide superior durability for high-traffic kitchens but require longer drying times and produce stronger odors. These paints create harder surfaces that resist chips and scratches from constant opening and closing.
Chalk paint offers excellent coverage without extensive sanding but needs protective topcoats in kitchen environments. We suggest applying two coats of polyurethane over chalk paint to prevent moisture damage around sink areas.
Specialty cabinet paints like Benjamin Moore Advance or Sherwin Williams ProClassic contain self-leveling properties that eliminate brush marks. These premium options cost more upfront but deliver professional-looking results without hiring contractors.
Select Colors That Brighten Your Space
White cabinets remain the most popular choice because they make small kitchens appear larger and reflect natural light throughout the room. We particularly love Benjamin Moore Cloud White and Sherwin Williams Pure White for their clean appearance.
Light gray tones like Agreeable Gray or Classic Gray add sophistication while maintaining brightness in your kitchen space. These neutral colors complement both warm and cool accent pieces without overwhelming your design scheme.
Soft blue shades such as Sea Salt or Palladian Blue create calming atmospheres while still reflecting light effectively. We’ve noticed these colors work especially well in kitchens with white countertops and stainless steel appliances.
Cream and off-white options provide warmth without the starkness of pure white while still brightening darker kitchen spaces. Colors like Vanilla Milkshake or Creamy White pair beautifully with wood floors and brass hardware.
Prep and Prime for Professional Results
Remove all cabinet doors and hardware before starting your painting project to ensure even coverage and prevent paint buildup around hinges. We recommend labeling each door and its corresponding frame location for easy reassembly.
Clean surfaces thoroughly with degreasing cleaner to remove cooking residue that prevents paint adhesion. TSP substitute or Dawn dish soap mixed with warm water effectively removes years of accumulated grease and grime.
Sand lightly with 220-grit sandpaper to create texture for primer bonding without removing existing finish completely. Focus extra attention on areas around handles where oils from hands create the most buildup.
Apply high-quality primer specifically designed for kitchen cabinets to ensure paint adheres properly and prevents bleed-through from previous finishes. We always use two thin coats of primer rather than one thick application for better coverage and durability.


Update Your Hardware for Maximum Impact

While fresh cabinet paint transforms your kitchen’s overall appearance, updating the hardware creates those finishing touches that elevate the entire space from basic to brilliant.
Replace Cabinet Knobs and Pulls
Swapping old cabinet knobs and pulls delivers one of the biggest visual impacts for the smallest investment in any kitchen makeover. Modern homeowners can choose from countless styles, from sleek contemporary bar pulls to vintage inspired cup pulls that complement newly painted cabinets perfectly.
Consider the finish carefully when selecting new hardware to ensure it coordinates with your kitchen’s updated color scheme. Brushed gold and matte black finishes currently dominate kitchen design trends, while stainless steel remains a timeless choice for contemporary spaces.
Match the hardware size to your cabinet doors and drawers for the most professional appearance. Larger cabinets typically require longer pulls (4-6 inches), while smaller doors and drawers look best with shorter pulls or knobs (1-3 inches).
Budget approximately $3-15 per piece for quality cabinet hardware that’ll withstand daily use. Installation takes just minutes per piece using a simple screwdriver, making this an ideal weekend DIY project.
Upgrade Your Faucet and Fixtures
Installing a new kitchen faucet instantly modernizes your workspace while potentially adding smart functionality to your daily routine. Touchless faucets have become increasingly popular, allowing you to turn water on and off with a simple wave of your hand.
Choose faucets with pull down or pull out sprayers for enhanced versatility when washing dishes and filling large pots. These features make kitchen tasks significantly more efficient while maintaining a sleek, professional appearance.
Smart faucets with voice activation and temperature control represent the cutting edge of kitchen technology. These advanced fixtures can dispense precise amounts of water at exact temperatures, perfect for cooking tasks that require exact measurements.
Expect to invest $150-500 for a quality kitchen faucet that’ll serve your family for years to come. Professional installation typically costs an additional $100-200, though many DIY enthusiasts can handle the project themselves.
Install New Light Switch Covers
Replacing outdated light switch covers creates a cohesive look that ties your entire kitchen makeover together seamlessly. These small details make a surprisingly big difference in achieving that professionally designed appearance.
Select switch plate colors and finishes that complement your new cabinet hardware for maximum visual impact. Matching metallic finishes like brushed nickel or oil rubbed bronze create sophisticated coordination throughout the space.
Upgrade to decorator style switch plates with clean lines and premium materials for an elevated aesthetic. Stainless steel, glass, and ceramic options offer durability while maintaining their appearance through years of daily use.
This simple update costs just $5-15 per switch plate and takes only minutes to complete with a basic screwdriver. We recommend replacing all visible switch plates and outlet covers simultaneously to maintain consistency throughout your refreshed kitchen.
Add a Stunning Backsplash to Create Visual Interest

Transform your kitchen’s appearance with a stunning backsplash that creates dramatic visual impact. Bold and textured backsplashes using materials like glass, metal, or ceramic tiles offer unique looks that instantly elevate your space.
Choose Subway Tiles for Timeless Appeal
Subway tiles deliver classic elegance that works with virtually any kitchen style. We recommend these versatile rectangular tiles because they’ve remained popular for decades and complement both traditional and modern designs. Installing subway tiles in a standard brick pattern creates clean lines that make your kitchen feel larger and brighter.
Different layouts like herringbone or vertical stacking can add contemporary flair while maintaining the timeless subway tile aesthetic. White subway tiles remain the most popular choice, but colored options in soft gray, sage green, or navy blue can introduce subtle personality without overwhelming your design.
Consider Natural Stone for Luxury Look
Natural stone backsplashes like marble or granite add sophisticated luxury that increases your home’s value. We’ve seen how these materials create stunning focal points with their unique veining patterns and rich textures that can’t be replicated with manufactured tiles.
Marble brings elegant beauty with its distinctive veining, while granite offers durability and heat resistance that’s perfect for areas behind cooktops. Travertine and slate provide more rustic textures that work beautifully in farmhouse or Mediterranean kitchen styles.
Stone requires sealing to prevent stains and water damage, but proper maintenance keeps these surfaces looking beautiful for decades.
Install Peel-and-Stick Options for Budget-Friendly Updates
Peel-and-stick tiles and decals offer cost-effective backsplash updates that you can complete in a single weekend. We love these products because they require no special tools, adhesives, or professional installation while still delivering impressive visual transformation.
Modern peel-and-stick options closely mimic natural materials like subway tile, marble, and wood with realistic textures and patterns. Quality products resist heat and moisture, making them suitable for areas around sinks and stoves.
Removing these tiles is simple when you’re ready for your next update, making them perfect for renters or anyone who likes changing their decor frequently.
Replace Countertops to Elevate Your Kitchen’s Style

Nothing transforms a kitchen quite like replacing countertops. We’ve found that updated surfaces can completely change how your space looks and functions while adding important value to your home.
Explore Quartz for Durability and Beauty
Quartz countertops have surged in popularity as engineered surfaces that combine beauty with exceptional performance. We recommend quartz because it’s highly resistant to stains, scratches, and heat, making it perfect for busy kitchens where durability matters most.
Designers love quartz for its vast design options, including patterns that mimic natural stone like marble and granite. You’ll find quartz available in countless colors and finishes, from solid whites and grays to dramatic veined patterns that create stunning focal points.
Customization possibilities with quartz include innovative edge profiles and waterfall designs that extend down cabinet sides for a sleek, modern look. We’ve seen homeowners pair quartz islands with contrasting perimeter counters to create visual zones that define different kitchen areas.
Maintenance becomes effortless with quartz since its non-porous surface doesn’t require sealing like natural stone. Simply wipe clean with soap and water to keep your investment looking pristine for years to come.
Consider Butcher Block for Warmth
Butcher block countertops bring natural warmth and character that makes kitchens feel inviting and homey. We often recommend hardwoods like maple or walnut for their durability and beautiful grain patterns that add organic texture to modern spaces.
Functionality shines with butcher block surfaces, especially in prep zones where you can chop directly on the wood without damaging knives. Professional chefs appreciate how wood naturally has antibacterial properties when properly maintained and seasoned regularly.
Proper sealing protects butcher block from moisture and bacteria, requiring periodic maintenance with food-safe oils or polyurethane finishes. We suggest monthly oiling for high-use areas to prevent cracking and maintain the wood’s natural luster.
Design versatility allows butcher block to complement both farmhouse and contemporary aesthetics, often paired with quartz or marble sections for mixed material looks. Color options range from light maple to rich walnut tones that develop beautiful patina over time.
Evaluate Laminate for Cost-Effective Answers
Laminate countertops offer incredible value without sacrificing style, making kitchen makeovers accessible for every budget. We’ve watched laminate technology advance dramatically, with modern options featuring realistic textures that convincingly mimic wood, stone, and concrete surfaces.
Installation costs remain significantly lower than natural materials, allowing you to achieve high-end looks for a fraction of the price. Today’s laminates include options with beveled edges and integrated sinks that create seamless, custom appearances.
Maintenance simplicity makes laminate perfect for busy families since surfaces clean easily with standard household cleaners. New finishes resist scratches and stains better than older generations, extending the lifespan considerably.
Color and pattern variety in laminate continues expanding, with manufacturers introducing realistic marble veining, wood grains, and even metallic finishes. We recommend viewing samples in different lighting conditions to ensure your chosen pattern complements your kitchen’s overall design scheme.
Install New Lighting to Brighten Your Workspace

Poor lighting makes even the most beautiful kitchen feel uninviting and difficult to work in. Strategic lighting updates can transform your workspace while adding both functionality and style to your kitchen makeover.
Add Under-Cabinet LED Strips
Under-cabinet LED strips create ambient lighting that highlights your countertops beautifully. We love how these fixtures eliminate shadows cast by overhead lighting, making food prep tasks much easier and safer. Installing LED strips yourself takes just a few hours and typically costs between $50-150 for most kitchens.
Modern LED strips offer multiple color temperatures, from warm 2700K for cozy evening ambiance to bright 4000K for daytime cooking tasks. You can find battery-powered options for renters or hardwired versions that connect directly to your electrical system. Popular brands like Philips Hue and LIFX even offer smart LED strips that you can control with your smartphone or voice commands.
Hang Pendant Lights Over Islands
Pendant lights over kitchen islands provide both task lighting and visual appeal that draws the eye upward. We recommend hanging two to three pendants for islands longer than 6 feet, spacing them 24-30 inches apart for optimal light distribution. Choose fixtures that hang 30-36 inches above your island surface to avoid blocking sightlines while cooking.
Statement pendant lights can serve as artwork for your kitchen, whether you prefer sleek glass globes, industrial metal shades, or warm wood accents. Consider the scale of your island when selecting size – larger islands can handle bigger, bolder fixtures while smaller spaces benefit from more delicate designs. Dimmable pendants offer flexibility for both bright task lighting and softer ambient lighting during entertaining.
Update Recessed Lighting Fixtures
Recessed lighting fixtures ensure even light distribution throughout your kitchen workspace. We suggest spacing recessed lights 4-6 feet apart and positioning them 18-24 inches from wall cabinets to minimize shadows on your work surfaces. Modern LED recessed lights use 75% less energy than traditional incandescent bulbs while lasting 25 times longer.
Upgrading to adjustable trim recessed lights allows you to direct light exactly where you need it most. You can highlight exact areas like your sink, stove, or prep counter with focused beams. Smart recessed lights with dimming capabilities let you adjust brightness levels throughout the day, creating the perfect atmosphere for morning coffee or evening dinner parties.
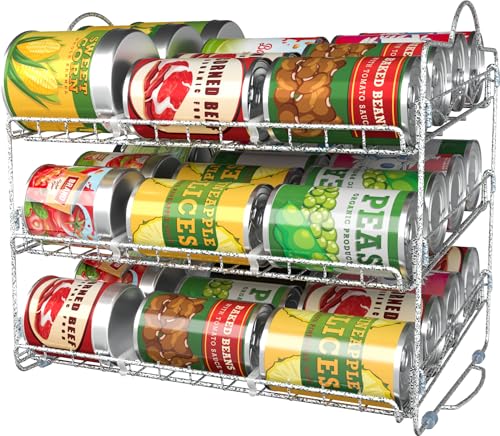
Organize Your Storage to Maximize Functionality

Smart storage answers can transform your kitchen’s efficiency without requiring a complete renovation. We’ll explore three key strategies that maximize every inch of available space.
Install Pull-Out Drawers in Lower Cabinets
Pull-out drawers revolutionize how we access items stored in deep lower cabinets. These sliding systems bring everything within easy reach, eliminating the need to crawl on hands and knees to find pots and pans buried in the back corners.
Installing these drawers makes heavy cookware and bulky appliances much more accessible. We recommend focusing on cabinets where you store items weighing more than 5 pounds, as these benefit most from the improved accessibility. Professional installation typically costs between $150-300 per cabinet, but the convenience factor makes this investment worthwhile for busy kitchens.
Soft-close mechanisms prevent slamming and extend the hardware’s lifespan. Many homeowners report using previously forgotten items once they install these drawer systems, effectively increasing their usable storage by up to 40%.
Add Lazy Susans for Corner Accessibility
Lazy Susans transform awkward corner cabinets into highly functional storage spaces. These rotating platforms allow us to access items that would otherwise remain hidden in hard-to-reach corners, making every inch of cabinet space productive.
Corner cabinets often become black holes where items disappear forever. Lazy Susans solve this problem by bringing stored goods to you with a simple spin, eliminating the frustration of digging through cluttered corners.
Two-tier lazy Susans maximize vertical space while keeping items organized by category. We suggest placing frequently used spices and condiments on the lower level, with backup supplies or seasonal items on the upper tier. This rotating system can increase corner cabinet efficiency by up to 60% compared to traditional fixed shelving.
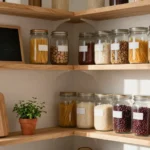
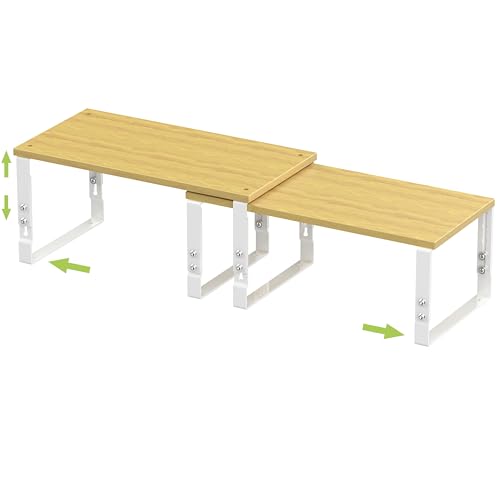
Create Vertical Storage Answers
Vertical storage maximizes your kitchen’s cubic footage by utilizing wall space and cabinet height effectively. Wall-mounted shelves, magnetic strips, and hanging systems transform empty walls into valuable storage real estate.
Installing floating shelves above countertops provides convenient spots for frequently used items like oils, spices, and cooking utensils. These open shelves keep essentials within arm’s reach while cooking, reducing preparation time and kitchen traffic.
Magnetic knife strips and spice containers free up valuable drawer and counter space. We recommend mounting these magnetic answers on walls near prep areas for maximum convenience. Hanging pot racks use ceiling space effectively, especially in kitchens with high ceilings or kitchen islands.
Tall cabinets that extend to the ceiling provide additional storage for seasonal items and rarely used appliances. Adding cabinet organizers like tiered shelf inserts can double the storage capacity of existing cabinets, making vertical space work harder for your kitchen needs.

Refresh Your Appliances for a Modern Look

Upgrading your appliances creates an instant visual impact that transforms your entire kitchen aesthetic. Modern appliances serve as focal points that define your kitchen’s style while delivering enhanced functionality.
Choose Stainless Steel for Contemporary Appeal
Stainless steel appliances provide a sleek, sophisticated look that complements various design styles throughout your kitchen. We recommend this classic choice because it creates a timeless foundation that works beautifully with both traditional and contemporary decor schemes.
Professional kitchens have long favored stainless steel for its durability and clean appearance. Your investment in stainless steel appliances will maintain their appeal for years while offering easy maintenance and superior performance.
Coordinating your refrigerator, dishwasher, and range in matching stainless steel creates a cohesive design flow. This unified approach makes your kitchen appear more polished and intentionally designed rather than collected over time.
Consider Black Stainless for Unique Style
Black stainless steel appliances offer a darker, more dramatic aesthetic that adds a unique touch to your kitchen design. We’ve seen this bold choice become increasingly popular among homeowners who want to make a sophisticated statement.
Fingerprint resistance makes black stainless particularly appealing for busy families who want style without constant cleaning. Your black stainless appliances will maintain their dramatic appearance with minimal upkeep compared to traditional stainless options.
Pairing black stainless with warm wood tones or white cabinetry creates stunning visual contrast. This combination allows you to achieve a modern look while maintaining warmth and character in your space.
Update Small Appliances for Cohesive Design
Integrating small appliances ensures that toasters, blenders, and coffee makers match the style of your larger appliances to maintain a cohesive look. We suggest selecting small appliances in coordinating finishes to create visual harmony across your countertops.
Grouping similar colored small appliances in designated zones reduces visual clutter while maintaining functionality. Your kitchen will appear more organized and professionally designed when all appliances work together as a unified collection.
Storage answers for small appliances keep countertops clean while preserving easy access. Consider appliance garages or dedicated cabinet spaces that allow you to maintain your cohesive design while maximizing workspace efficiency.

Incorporate Open Shelving for Display and Storage

Open shelving transforms kitchen storage while creating stunning visual displays that showcase your personality and style. This design trend offers both functional benefits and aesthetic appeal for modern kitchen makeovers.
Style Floating Shelves with Dishes and Decor
Floating shelves create a modern and minimalist look that opens up your kitchen space dramatically. We recommend displaying your favorite dishes, glasses, and decorative items to add visual interest and personal character to the room. Mix practical items like everyday plates and bowls with decorative pieces such as small plants, ceramic vases, or vintage cookbooks for a curated appearance.
Position floating shelves at varying heights to create ever-changing visual flow throughout the space. Group items in odd numbers like sets of three or five for the most pleasing aesthetic arrangement. Consider alternating between functional pieces and decorative elements on each shelf to maintain visual balance.
Replace Upper Cabinets with Open Storage
Upper cabinet replacement with open shelving creates a more spacious feel that makes even small kitchens appear larger. This design allows for easy access to frequently used items while maintaining an airy, uncluttered atmosphere. We’ve found that this approach works particularly well in galley kitchens or spaces with low ceilings where traditional cabinets might feel overwhelming.
Strategic placement of open storage keeps essential items within arm’s reach during cooking and meal preparation. Display beautiful serving pieces, colorful dishware, and attractive storage containers that complement your kitchen’s color scheme. This approach eliminates the frustration of digging through deep cabinet shelves while adding architectural interest to blank wall spaces.
Add Plate Racks for Functional Display
Plate racks elegantly display plates while adding a touch of classic style that works with both traditional and contemporary kitchen designs. These versatile storage answers can house frequently used items like cutting boards, serving dishes, or decorative plates that deserve to be showcased. Install plate racks above countertops or incorporate them into existing shelving systems for maximum functionality.
Choose between wall mounted racks for smaller collections or freestanding units that can accommodate larger dish sets. Wooden plate racks bring warmth to the space while metal versions offer industrial appeal that complements modern appliances. We recommend positioning plate racks near your primary food prep area for convenient access during cooking tasks.


Create a Kitchen Island for Extra Workspace

Adding a kitchen island transforms your cooking space into a multifunctional hub for food preparation, storage, and socializing. We’ll explore three practical approaches that suit different budgets and kitchen layouts.
Build a Simple Rolling Cart Island
Rolling carts offer the ultimate flexibility for smaller kitchens or spaces where permanent fixtures aren’t feasible. These wheeled workstations provide extra prep space that moves wherever you need it most.
Position your rolling cart strategically during meal prep, then wheel it away when you need more floor space. Choose models with multiple tiers to maximize storage for utensils, cookware, and ingredients. Look for carts with locking wheels to ensure stability during food preparation tasks.
Select carts with butcher block tops for durability and cutting functionality. Consider stainless steel options that complement modern appliances and provide easy cleanup surfaces. Add hooks or rails to the sides for hanging kitchen tools and towels.
Convert a Dresser into Kitchen Storage
Repurposing furniture creates unique kitchen islands while maximizing your budget and adding character to your space. Old dressers transform into functional storage units with surprising ease and creativity.
Install a butcher block or stone countertop on your dresser’s surface to create a proper workspace. Remove or modify drawers to accommodate kitchen essentials like dishes, linens, and small appliances. Paint the dresser to match your kitchen’s color scheme and protect the wood from moisture.
Ensure the dresser height works comfortably for food preparation tasks, typically 36 inches. Add casters to the bottom if you want mobility options without committing to a permanent fixture. Consider removing some drawer fronts to create open shelving for frequently used items.
Install a Permanent Island with Seating
Permanent islands with built-in seating create the ultimate kitchen gathering spot while providing substantial workspace and storage. These installations require more planning but deliver maximum functionality and home value.
Design your island with a 10-12 inch overhang to accommodate comfortable seating for bar stools or chairs. Include electrical outlets in your island design to power small appliances and charging stations. Plan for 24 inches of space per person when calculating seating capacity.
Install pendant lights 30-36 inches above your island’s surface to provide adequate task lighting. Incorporate drawers and cabinets underneath for storing dishes, cookware, and pantry items. Consider adding features like wine storage, a prep sink, or built-in cutting boards to enhance functionality.
Ensure adequate clearance of 36-48 inches around all sides of your permanent island for comfortable movement. Choose durable countertop materials like quartz or granite that withstand daily use and maintain their appearance over time.


Conclusion
These kitchen makeover ideas prove that stunning transformations don’t require massive budgets or months of construction. We’ve shown you how strategic updates like painted cabinets fresh lighting and smart storage answers can completely reimagine your space for a fraction of traditional renovation costs.
The beauty of these approaches lies in their flexibility – whether you’re tackling a weekend DIY project or planning a more comprehensive upgrade you can customize these strategies to fit your timeline and budget. From simple hardware swaps to bold backsplash installations each element works together to create your dream kitchen.
We encourage you to start with one or two updates that excite you most then build from there. Your kitchen makeover journey begins with that first small step and before you know it you’ll have the functional beautiful space you’ve always wanted.
Frequently Asked Questions
Can I really transform my kitchen for under $200?
Yes! Painting your kitchen cabinets is one of the most cost-effective transformations you can make for under $200. This simple DIY project can dramatically change your kitchen’s appearance in just a weekend. Combined with updated hardware like new cabinet knobs and pulls, you can achieve a completely refreshed look without breaking the bank.
What’s the easiest DIY kitchen update for beginners?
Painting cabinets is the most beginner-friendly project that delivers maximum impact. Choose the right paint type for durability, and you can complete this transformation over a weekend. Other easy updates include replacing cabinet hardware, updating light switch covers, and installing peel-and-stick backsplash tiles.
Are peel-and-stick backsplashes worth it?
Absolutely! Peel-and-stick backsplashes are perfect for renters or anyone wanting a quick, budget-friendly update. They’re easy to install, require no special tools, and can be removed without damage. While they may not last as long as traditional tiles, they offer an affordable way to add style and personality to your kitchen.
Which countertop material offers the best value?
It depends on your budget and needs. Quartz offers the best durability and low maintenance with stain and scratch resistance. Butcher block provides warmth and character at a mid-range price. Laminate is the most budget-friendly option and now comes in realistic textures that mimic more expensive materials.
How much can pull-out drawers improve my kitchen storage?
Pull-out drawers can increase accessibility to your lower cabinets by up to 40%. They make it easy to reach heavy items stored in the back of deep cabinets, reducing strain and improving organization. This upgrade is especially valuable for corner cabinets and lower storage areas.
What lighting updates make the biggest difference?
Under-cabinet LED strips have the most immediate impact by eliminating shadows and improving task lighting for food prep. Pendant lights over kitchen islands add both functionality and style. Updating recessed lighting with modern LED fixtures ensures even light distribution and energy efficiency throughout your kitchen space.
Can I add a kitchen island to a small kitchen?
Yes! A rolling cart island is perfect for smaller kitchens as it provides extra workspace and storage while remaining flexible and moveable. You can also convert an old dresser into a unique island or build a simple DIY version. Choose an option that fits your space and doesn’t impede traffic flow.
How do I choose between open shelving and traditional cabinets?
Open shelving works best if you enjoy displaying dishes and keep items organized. It creates a more spacious feel, especially in smaller kitchens. However, traditional cabinets offer more storage and hide clutter better. Consider your lifestyle, storage needs, and willingness to maintain organized displays when making this decision.
What’s the best way to coordinate appliances on a budget?
Focus on larger appliances first – refrigerator, stove, and dishwasher in matching finishes like stainless steel or black stainless steel. Then gradually update smaller appliances in coordinating finishes. You don’t need to replace everything at once; building a cohesive look over time is more budget-friendly and sustainable.
How can lazy Susans improve corner cabinet storage?
Lazy Susans can enhance corner cabinet usability by up to 60% by making items in hard-to-reach corners easily accessible. They’re perfect for storing spices, canned goods, or cleaning supplies. This simple addition transforms wasted corner space into functional storage that you’ll actually use regularly.