We’ve all been there – standing in front of our pantry wondering where that can of tomatoes disappeared to or why we bought three boxes of pasta when we already had four. A disorganized pantry doesn’t just waste time and money; it turns cooking from a joy into a frustrating treasure hunt.
The good news? Transforming your chaotic pantry into an organized haven isn’t as overwhelming as it seems. With the right strategies and simple systems you can create a space that’s both functional and visually appealing.
Whether you’re working with a walk-in pantry or a single cabinet we’ll show you practical organization ideas that’ll revolutionize how you store and find your food. From maximizing vertical space to creating zones for different items these answers will help you maintain order long after the initial setup. Let’s jump into the strategies that’ll turn your pantry into the organized space you’ve always wanted.
Clear Out and Clean Your Pantry Space
Starting with a completely empty pantry gives us the perfect foundation for creating an organized system that works. This essential first step reveals the true potential of our storage space.
Remove All Items and Check Expiration Dates
Empty your pantry completely by taking everything out and placing items on a nearby counter or table. We recommend grouping similar items together as you remove them to make the sorting process easier later.
Check expiration dates on every single item you’ve removed from your pantry space. Discard anything that’s expired, stale, or shows signs of spoilage like dented cans or pest damage. Keep track of what you’re throwing away to avoid purchasing duplicates in the future.
Sort remaining items into three categories: keep, donate, and relocate. Items you rarely use but are still good can go to a food bank, while products that belong in other areas of your kitchen should be set aside for proper placement.
Deep Clean Shelves and Surfaces
Vacuum or sweep the empty pantry to remove crumbs, dust, and debris that accumulate over time. Pay special attention to corners and crevices where spills and particles tend to hide.
Wipe down all shelves, walls, and surfaces with a damp cloth and mild cleaning solution. We suggest using warm soapy water or a gentle all-purpose cleaner to remove sticky residue and stains without damaging surfaces.
Allow everything to dry completely before moving to the next step. This prevents moisture from creating mold or mildew issues once you start restocking your organized pantry.
Assess Your Available Storage Space
Measure your pantry’s dimensions including height, width, and depth of each shelf. Write down these measurements as they’ll help you choose the right storage containers and organizers later.
Take note of any awkward spaces, dead zones, or areas that are difficult to reach. These spots often become problem areas where items get lost or forgotten, so we’ll need creative answers for them.
Evaluate the current shelf configuration and consider whether adjustments would better serve your needs. Many pantries benefit from adding or repositioning shelves to create zones for different types of items like snacks, baking supplies, and canned goods.
Categorize Items by Food Type and Usage

We’ll transform your pantry into an efficient storage system by grouping items logically and creating functional zones. This strategic approach makes meal planning easier and prevents duplicate purchases.
Group Similar Items Together
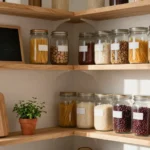
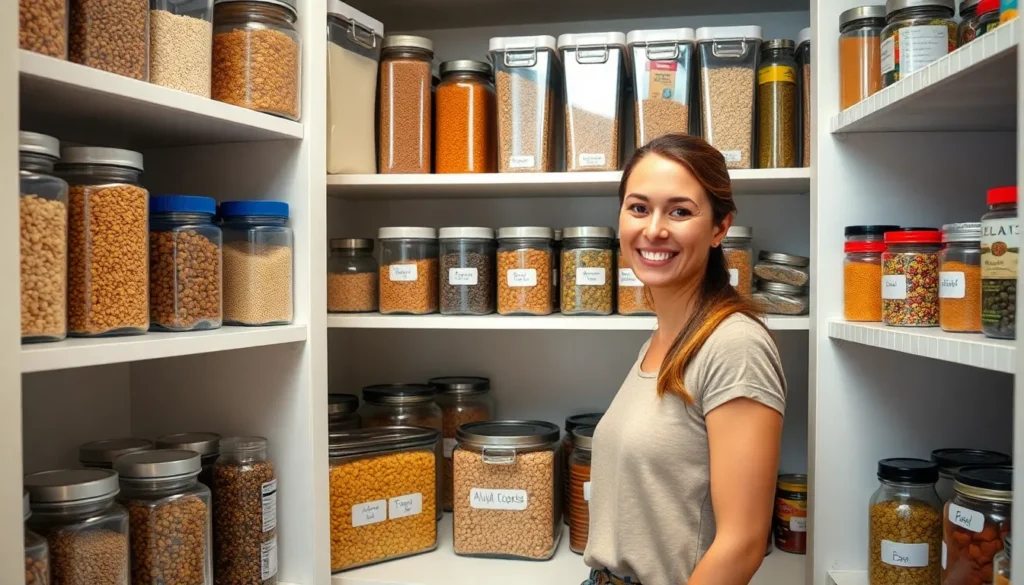
Consolidate similar products like canned goods, spices, and baking essentials into dedicated sections for easy retrieval. Store items such as flour, sugar, and cereals in clear containers to keep them fresh and visible while maintaining a cohesive look.
Label each category clearly to identify what’s stored in each section, making it easier to find what you need quickly. This system works especially well for frequently used items like pasta staples, grains and beans, and cooking oils.
Position taller items like cereal boxes and large containers toward the back, with shorter items in front for better visibility. Create vertical storage answers by stacking similar sized cans and jars to maximize shelf space.
Separate Daily Use from Occasional Items
Place frequently used items at easy-to-reach locations, typically at eye level or within arm’s reach on middle shelves. Reserve harder-to-reach areas like top shelves and deep corners for less frequently used items such as specialty baking ingredients or holiday items.
Apply the “First In, First Out” rule by placing older items at the front of shelves to ensure they’re used before they expire. This rotation system prevents waste and keeps your inventory fresh.
Designate prime real estate for daily essentials like coffee, tea, breakfast items, and cooking staples. Store these items between shoulder and waist height for comfortable access during busy meal preparation times.
Create Zones for Different Meal Types
Establish meal prep zones for exact meal types, such as a breakfast station with cereal and oats, or a dinner station with pasta and sauces. This approach streamlines cooking by keeping related ingredients together.
Create snack stations with easy-to-grab items stored in accessible bins or baskets, particularly useful for kids’ items and healthy snack options. Position these zones at appropriate heights for family members who use them most.
Design baking essentials into their own dedicated area with flour, sugar, vanilla, and measuring tools within reach. Group spices and seasonings near cooking zones to support efficient meal preparation workflows.
Invest in Clear Storage Containers and Labels

Clear storage containers transform our pantry into a well-organized space where we can quickly identify ingredients without opening multiple containers. This investment pays off through reduced food waste and streamlined meal preparation.
Choose Airtight Containers for Dry Goods
Airtight containers preserve freshness and prevent moisture from entering, which can spoil dry goods like flour, sugar, and pasta. We recommend selecting containers with secure sealing mechanisms that create a tight barrier against air and humidity. These containers protect our ingredients from pests while maintaining optimal texture and flavor for months longer than original packaging allows.
Quality airtight storage also prevents cross-contamination between different dry goods. We’ll find that spices retain their potency, cereals stay crispy, and baking ingredients maintain their consistency when properly sealed. Rice, quinoa, and other grains benefit significantly from this protection against environmental factors that cause staleness.
Use Uniform Container Sizes for Visual Appeal
Using containers of similar sizes creates a visually appealing and organized pantry while making it easier to stack and store items efficiently. We achieve a cohesive look when our storage containers follow consistent dimensions and design elements. Stackable containers maximize vertical space utilization and create clean lines throughout our pantry shelves.
Uniform sizing also simplifies our restocking process since we know exactly how much space each container requires. We can plan our pantry layout more effectively when containers fit together like puzzle pieces. This approach reduces wasted space between containers and creates a professional appearance that rivals commercial kitchen organization.
Label Everything with Contents and Dates
Label each container with its contents and the date it was stored to ensure we use the oldest items first according to the “First In, First Out” principle. We should include both the item name and storage date on waterproof labels that won’t fade or peel over time. This system prevents confusion when containers look similar and helps us track freshness across all stored goods.
Clear labeling reduces the time we spend searching for exact ingredients during cooking sessions. We recommend using a consistent labeling format throughout our pantry to maintain visual organization and readability. Digital label makers or handwritten tags both work effectively as long as we maintain legible, uniform text across all containers.
Maximize Vertical Space with Shelf Organizers

Vertical space often remains the most underutilized area in our pantries. We can transform this wasted potential into efficient storage zones with the right shelf organizers.
Install Additional Shelving Units
Adding adjustable shelves creates multiple storage levels within our existing pantry framework. We recommend installing shelves that can accommodate items of varying sizes while keeping frequently used products within easy reach. Metal wire shelving units work particularly well because they allow air circulation around stored goods. Adjustable brackets let us customize spacing between shelves based on our exact storage needs. Tension-mounted shelves offer a damage-free solution for renters who can’t make permanent modifications to their pantry walls.
Use Stackable Bins and Baskets
Stackable bamboo bins help us create organized “stations” for different food categories throughout our pantry. We can designate exact bins for coffee supplies, snack items, or baking essentials to maintain clear organization zones. These containers prevent small items from getting lost in the back corners of deep shelves. Clear plastic alternatives allow us to see contents at a peek without removing each container. Uniform sizing across our bin collection creates a cohesive visual appearance while maximizing our available shelf space.
Add Over-the-Door Storage Answers
Installing hooks or baskets on the back of our pantry door creates valuable storage real estate for specialty items. We can store less frequently used products like spices, cooking oils, or unique ingredients in these accessible door-mounted systems. Over-the-door organizers with multiple pockets work perfectly for small condiment bottles and seasoning packets. Wire racks designed for door mounting can hold cleaning supplies or paper towels without taking up precious shelf space. This storage method keeps items visible and prevents them from becoming forgotten in our main pantry areas.
Create a First-In, First-Out System

We need to establish a systematic approach to prevent food waste and ensure we’re using ingredients before they expire. This rotation method keeps our pantry organized and maximizes the value of our grocery investments.
Place Newer Items Behind Older Ones
Positioning fresh groceries behind existing stock creates a natural flow that ensures older items get used first. We should consistently place new purchases toward the back of shelves, allowing the oldest products to remain at the front where we’ll naturally reach for them during meal preparation.
Restocking becomes effortless when we develop this habit as part of our grocery routine. Every time we bring home new items, we’ll move older products forward and place newer ones behind them. This simple practice prevents ingredients from hiding in the back corners of our pantry where they’re easily forgotten and left to spoil.
Stacking canned goods requires special attention to maintain proper rotation order. We can stack newer cans underneath older ones or create separate columns for different purchase dates to ensure the oldest items remain visible and accessible.
Use Clear Containers to Monitor Quantities
Transparency allows us to quickly assess our inventory levels for dry goods like flour, sugar, pasta, and cereal without opening multiple containers. Clear, airtight storage keeps ingredients fresh by sealing out moisture and pests while providing immediate visibility of contents and quantities.
Monitoring becomes automatic when we can see exactly how much of each ingredient remains. We’ll know when to add items to our shopping list before running out completely, preventing those frustrating moments when we’re halfway through a recipe and discover we’re missing a key ingredient.
Sealing mechanisms on quality clear containers preserve freshness far better than original packaging. These containers protect against pantry pests and humidity while maintaining the visual benefits that support our rotation system.
Carry out Rotation Schedule for Perishables
Inspection of canned goods, bottled items, and other semi-perishables should happen weekly or biweekly to catch expiration dates before they pass. We can use risers or shelving organizers to create tiered storage that keeps older items visible in front while newer products wait their turn in back.
Scheduling regular pantry checks ensures nothing gets forgotten or overlooked during busy weeks. Setting a recurring reminder on our phones or calendars helps maintain this habit without relying on memory alone.
Rotating items according to expiration dates requires us to check dates during each inspection and physically move products as needed. We should focus on items with shorter shelf lives first, then work through longer-lasting goods to maintain an efficient system that minimizes waste.
Designate Specific Areas for Different Categories

Creating dedicated zones for different food types transforms your pantry from chaotic storage into an efficient system. We’ll establish specialized areas that make cooking and meal prep significantly easier.
Establish a Baking Station
Baking stations work best when we store flour, sugar, and baking powder in clear containers to maximize space and visibility. Clear storage allows us to quickly assess ingredient levels without opening multiple packages, preventing those frustrating moments when we discover we’re out of flour mid-recipe.
Turntables revolutionize spice management by keeping seasonings organized and easily accessible. We recommend positioning your spice turntable at eye level for quick identification during cooking. Store vanilla extract, food coloring, and other liquid baking essentials in small bins to prevent spills from spreading throughout the pantry.
Group measuring cups, mixing tools, and baking sheets near your ingredient storage when possible. This proximity creates a seamless workflow from ingredient gathering to actual baking.
Create a Snack Zone
Snack zones function optimally when we corral treats into a low drawer or shelf for easy access. Position this area where family members can reach items independently, reducing interruptions during meal preparation.
Bins and baskets contain loose snack packages while maintaining visual organization. We suggest using clear containers for items like crackers and granola bars, allowing everyone to see available options at a peek. Label each container with snack categories such as “protein bars,” “fruit snacks,” or “crackers” for quick identification.
Accessibility becomes crucial for households with children, so place kid-friendly snacks at their eye level. Store adult or special occasion treats on higher shelves to maintain portion control and prevent unauthorized snacking.
Set Up a Canned Goods Section
Canned goods sections require risers or additional shelves to separate items and make them easier to find. Tiered storage prevents cans from hiding behind each other, eliminating the frustration of discovering expired products months later.
Label each section with categories like “tomato products,” “beans and legumes,” or “soups and broths” for quick identification. We recommend grouping similar items together—place all pasta sauces in one area and all coconut milk varieties in another.
Store heavier canned items on lower shelves to prevent accidents and make restocking safer. Position frequently used cans like chicken broth or diced tomatoes at the front of each row, following the first in, first out principle to maintain freshness and prevent waste.
Utilize Door Space for Frequently Used Items

Door space offers valuable real estate that many people overlook when organizing their pantries. Maximizing this area creates additional storage without requiring expensive renovations or major changes to your existing setup.
Install Narrow Shelving on Door Backs
Installing narrow shelving on door backs transforms unused vertical space into practical storage for frequently accessed items. We recommend choosing adjustable wire or plastic shelving units that accommodate items like cooking oils, vinegars, and condiments without interfering with door closure.
Mounting these shelves at different heights allows us to store various sized containers efficiently. Taller bottles fit on lower shelves while smaller jars work perfectly on upper levels. The key is measuring your door’s clearance before installation to ensure smooth operation.
Consider weight distribution when loading these shelves to prevent door sagging or hardware failure. Lighter items like spice packets and seasoning mixes work best on upper shelves while heavier bottles should stay closer to the bottom.
Use Spice Racks for Small Containers
Spice racks mounted on pantry doors keep small containers organized and visible for quick identification during cooking. We suggest selecting racks with multiple tiers that can hold various container sizes from standard spice jars to small sauce bottles.
Magnetic spice strips offer another excellent solution for metal containers while maintaining easy access. These strips attach directly to metal pantry doors and hold spice jars securely without taking up shelf space.
Tiered spice racks create stadium style visibility where each container remains in view rather than hiding behind others. This arrangement prevents duplicate purchases and helps maintain our First In First Out rotation system.
Hang Measuring Tools and Kitchen Gadgets
Hanging measuring tools and kitchen gadgets on pantry doors keeps essential items within reach while freeing up valuable shelf space. We recommend installing hooks or a small pegboard system to accommodate measuring cups, spoons, and frequently used utensils.
Over the door storage racks with multiple hooks work perfectly for lightweight tools like measuring spoons, can openers, and small whisks. These racks typically accommodate 6 to 8 items without creating clutter or interfering with door function.
Consider dedicating exact hooks for different tool categories to maintain organization over time. Measuring tools can occupy the top section while mixing utensils hang lower for easy access during food preparation. This system ensures everything returns to its designated spot after use.
Implement a Regular Maintenance Schedule

Creating organized zones and smart storage answers only works if we maintain them consistently. A structured maintenance schedule ensures our pantry stays functional and prevents items from accumulating in the wrong places.
Schedule Monthly Organization Reviews
Monthly organization reviews keep our pantry system running smoothly and help us catch problems before they spiral out of control. We should walk through each zone during these reviews to ensure everything remains in its designated place and our labeling system stays current.
During these monthly checks, we’ll want to assess whether our current organization method still works for our cooking habits and family needs. Items might migrate to different zones over time, or we may discover that certain categories need more or less space than originally allocated.
Adjusting shelf heights and container placements during these reviews helps us accommodate new purchases and seasonal items that might not fit our original setup. We can also update labels that have become worn or unclear, ensuring our system remains user friendly for everyone in the household.
Perform Weekly Inventory Checks
Weekly inventory checks prevent expired items from accumulating and help us stay on top of what we actually have in stock. We should focus these checks on perishable items first, then move through our zones systematically to identify items approaching their expiration dates.
Checking our clear containers during these weekly reviews allows us to see exactly how much of each dry good remains without opening multiple packages. This visibility helps us plan meals around ingredients we need to use soon and prevents duplicate purchases at the grocery store.
Recording items that consistently go unused during these checks helps us make better purchasing decisions in the future. We can also identify patterns in our consumption habits and adjust our storage zones accordingly to better match how we actually cook and eat.
Plan Quarterly Deep Cleaning Sessions
Quarterly deep cleaning sessions remove dust buildup and give us a chance to thoroughly inspect our storage containers and shelf systems. We’ll want to remove everything from the pantry during these sessions to properly clean all surfaces and check for any signs of pest activity or moisture issues.
These deep cleaning sessions provide the perfect opportunity to wipe down our clear containers and check that their sealing mechanisms still work properly. We can also inspect our shelf organizers and lazy susans to ensure they’re still stable and functioning as intended.
Planning these sessions at the beginning of each season helps us prepare for different cooking patterns and holiday needs throughout the year. We can also use this time to rotate seasonal items and ensure our most frequently used ingredients remain easily accessible in our designated zones.
Conclusion
Transforming your pantry doesn’t have to be overwhelming when you break it down into manageable steps. We’ve covered everything from initial decluttering to ongoing maintenance strategies that’ll keep your space functional for years to come.
Remember that the key to pantry success lies in creating systems that work specifically for your lifestyle and cooking habits. Whether you’re working with a small cabinet or a walk-in pantry these organization principles can be adapted to fit your unique space.
The time you invest in organizing now will pay dividends every time you cook. You’ll spend less time searching for ingredients less money on duplicate purchases and more time enjoying the cooking process. Start with one section today and gradually work your way through the entire space – your future self will thank you.
Frequently Asked Questions
How often should I organize my pantry?
Perform weekly inventory checks to monitor expired items and plan meals accordingly. Schedule monthly organization reviews to ensure items remain in designated places and labels stay current. Conduct quarterly deep cleaning sessions to remove dust, inspect storage containers, and prepare for seasonal cooking needs. This regular maintenance schedule keeps your pantry efficient and organized long-term.
What’s the first step to organizing a messy pantry?
Start by completely emptying your pantry and checking expiration dates on all items. Sort everything into three categories: keep, donate, and relocate. Deep clean all shelves and surfaces to remove dust and debris, ensuring everything is completely dry before restocking. This clean slate approach sets the foundation for effective organization.
Should I use clear containers for pantry storage?
Yes, clear storage containers are highly recommended for pantry organization. They help you quickly identify ingredients, reduce food waste, and preserve freshness with airtight sealing. Use uniform container sizes for visual appeal and efficient stacking. Always label each container with contents and storage date to maintain proper usage and organization.
How do I maximize space in a small pantry?
Install additional shelving units or adjustable shelves to create multiple storage levels. Use stackable bins and baskets to organize different food categories and prevent small items from getting lost. Utilize over-the-door storage solutions for less frequently used items. Consider tension-mounted shelves if you’re renting and can’t make permanent modifications.
What is the FIFO system for pantry organization?
FIFO stands for “First In, First Out” – a system that prevents food waste by ensuring older items are used before newer ones. Place new purchases behind existing items so older products are easily accessible. Use clear containers to monitor inventory levels and perform regular inspections to catch expiration dates before items spoil.
How should I categorize pantry items?
Group similar products together such as canned goods, spices, and baking essentials. Create specific zones for different meal types like breakfast and dinner stations. Place frequently used items at eye level for easy access, while storing occasional-use items higher or lower. Position taller items at the back and shorter ones in front for better visibility.
What’s the best way to organize spices in the pantry?
Use turntables or lazy Susans for spice organization to improve accessibility and visibility. Consider mounting spice racks on pantry doors to save shelf space while keeping spices organized. Group spices alphabetically or by cuisine type, and use clear, uniform containers with labels to quickly identify what you need while cooking.
How can I use pantry door space effectively?
Install narrow shelving on pantry door backs for frequently accessed items like cooking oils and condiments. Mount spice racks for small containers, ensuring proper weight distribution to prevent door sagging. Hang measuring tools and kitchen gadgets to free up shelf space while keeping essential items within easy reach during cooking.