We’ve all stood in our yards wondering how to transform that challenging slope or rocky patch into something spectacular. Rock gardens aren’t just answers for difficult terrain – they’re stunning industry features that bring natural beauty and low-maintenance elegance to any outdoor space.
Rock garden landscaping combines the rugged appeal of stones with carefully selected plants to create breathtaking displays that thrive in various conditions. Whether you’re dealing with poor soil drainage or simply want to add visual interest to your property these versatile gardens offer endless creative possibilities.
From alpine-inspired arrangements to modern minimalist designs we’ll explore practical ideas that’ll help you create a rock garden that’s both beautiful and sustainable. You don’t need a mountain backdrop or extensive gardening experience – just the right combination of stones plants and strategic placement to transform your industry into a natural masterpiece.
Create a Japanese Zen Rock Garden for Tranquil Meditation
Zen rock gardens transform ordinary outdoor spaces into peaceful meditation retreats using minimal elements. These contemplative landscapes focus on simplicity and balance rather than colorful blooms or complex designs.
Choose the Right Sand and Gravel Materials
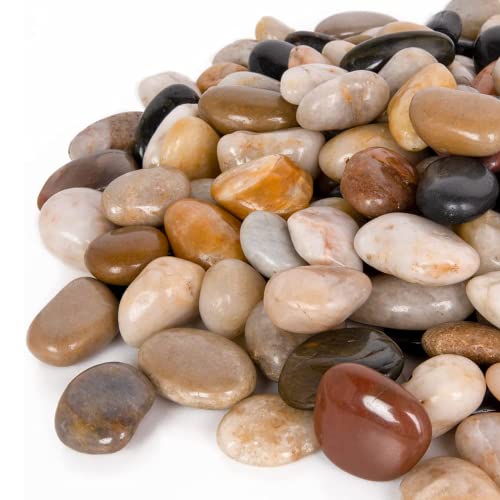
Fine white sand creates the foundation for authentic Japanese zen gardens. We recommend using decomposed granite or crushed limestone for the base layer since these materials provide excellent drainage while maintaining the clean aesthetic. Pea gravel works well as an alternative option for areas with heavy foot traffic.
Rake patterns become the signature element of your meditation space. Use a wooden rake with widely spaced tines to create flowing lines that represent water movement. Wave patterns radiating from rocks symbolize ripples on a pond’s surface. Straight parallel lines suggest calm flowing streams through your garden space.
Color consistency maintains the serene atmosphere throughout your design. Avoid mixing different colored gravels or sands since this creates visual chaos rather than peaceful harmony. Depth requirements typically range from 2 to 3 inches of material to achieve proper coverage and easy maintenance.
Position Rocks for Balance and Harmony
Odd numbered groupings follow traditional Japanese design principles for rock placement. We suggest using three or five stones as focal points since these arrangements create natural visual balance. Triangular formations work especially well with three rocks of varying heights positioned at different distances from each other.
Asymmetrical positioning prevents your garden from looking too formal or structured. Place the largest stone slightly off center to create ever-changing tension within the space. Varying heights add visual interest when you combine tall upright stones with lower horizontal pieces.
Natural weathering enhances the authentic appearance of your zen garden rocks. Choose stones with interesting textures or moss growth rather than perfectly smooth surfaces. Symbolic meanings can guide your placement decisions with tall stones representing mountains and flat stones symbolizing islands in water.
Add Minimalist Plant Accents
Single specimen plants provide subtle green elements without overwhelming the peaceful design. We recommend using one small Japanese maple or ornamental grass as a focal point near your rock groupings. Moss cultivation creates soft green carpets that complement the stark beauty of sand and stone.
Bamboo screening adds privacy while maintaining the Japanese aesthetic throughout your meditation space. Position tall bamboo stalks along the garden’s perimeter to create natural boundaries. Seasonal interest comes from carefully chosen plants that change subtly throughout the year without creating maintenance demands.
Ground cover options include hardy sedums or creeping thyme that spread slowly between rocks. These plants require minimal water once established and won’t compete with your garden’s contemplative atmosphere. Pruning requirements stay minimal when you select naturally compact plants that maintain their shape without frequent trimming.


Design a Cascading Rock Waterfall Feature

Creating a cascading rock waterfall feature transforms your rock garden into a ever-changing focal point that combines natural beauty with soothing water sounds. This water feature elevates the entire industry while providing a peaceful retreat from everyday stress.
Select Natural Stone for Authentic Appeal
Natural stone selection forms the foundation of your waterfall’s visual impact and long-term durability. Limestone and granite offer excellent choices for their natural weathering patterns and structural integrity.
Large boulders create the primary structure and anchor points for your waterfall design. Position these substantial stones to form natural ledges where water can pool and cascade gracefully to the next level.
Medium-sized rocks fill gaps between boulders and help direct water flow along predetermined paths. These transitional stones bridge the visual space while maintaining the waterfall’s natural appearance.
Small pebbles and gravel line the water channels and provide finishing touches that enhance authenticity. Choose varying colors and textures to create visual depth and prevent the monotonous appearance that uniform stones can produce.
Color coordination ensures your waterfall integrates seamlessly with existing rock garden elements. Select stones that complement rather than compete with your established industry palette.
Install Proper Water Circulation Systems
Water circulation systems require careful planning to maintain continuous flow while minimizing energy consumption and maintenance demands. Proper equipment selection ensures your waterfall operates efficiently throughout the seasons.
Submersible pumps provide the power needed to move water from the reservoir to the waterfall’s highest point. Calculate the required flow rate based on your waterfall’s height and desired water volume to select an appropriately sized pump.
Filtration systems maintain water quality by removing debris and preventing algae buildup that can clog your circulation system. Install both mechanical and biological filtration components for optimal water clarity.
Water reservoirs collect and store water for continuous recirculation throughout your waterfall system. Design the reservoir with adequate capacity to handle water loss from evaporation and splash while maintaining proper pump operation.
Underground plumbing connects all system components while remaining hidden from view. Use flexible tubing rated for outdoor use and bury connections below the frost line in colder climates.
Incorporate Surrounding Plant Life
Plant selection around your waterfall feature creates a naturalistic network that enhances both beauty and functionality. Strategic placement of vegetation softens hard rock edges while providing habitat for beneficial wildlife.
Succulents and groundcovers thrive in the well-draining conditions that rock gardens naturally provide. Ice plants and creeping thyme spread across rocky surfaces while requiring minimal water and maintenance.
Native plants adapt easily to local growing conditions and support regional wildlife populations. Research indigenous species that naturally occur near water sources in your area for the most authentic appearance.
Moisture-loving plants benefit from the increased humidity created by your waterfall’s spray and evaporation. Position ferns, mosses, and similar species within the waterfall’s microclimate for lush growth.
Layered planting creates visual depth and prevents soil erosion around your water feature. Combine different plant heights and textures to achieve natural-looking transitions between your waterfall and surrounding industry.


Build Raised Rock Garden Beds for Better Drainage

Elevated rock garden beds provide superior water management compared to ground-level plantings. We’ll construct these beds using strategic stone placement to prevent waterlogged soil and root rot while creating stunning visual appeal.
Layer Different Sized Stones for Structure
Building with multiple stone sizes creates both functional drainage and captivating visual depth. We start with large boulders as the foundation, positioning them to form the basic structure of our raised bed walls.
Medium rocks fill gaps between boulders while directing water flow through the bed system. These stones create natural pockets where smaller plants can establish roots while maintaining proper drainage channels.
Small pebbles serve as the finishing layer, smoothing transitions between larger stones and providing texture contrast. We place these carefully to prevent soil erosion while allowing water to percolate through the entire bed structure.
Varying elevations emerge naturally as we layer stones of different heights and widths. This technique transforms flat spaces into ever-changing landscapes with multiple planting zones at different moisture levels.
Choose Drought-Resistant Plants
Selecting water-wise plants ensures our raised rock beds thrive with minimal irrigation maintenance. Succulents like sedums and echeveria naturally complement rocky environments while storing water in their thick leaves.
Groundcovers such as creeping thyme and hardy ice plant spread naturally between stone crevices. These plants create living carpets that soften harsh rock edges while requiring infrequent watering once established.
Native plants adapted to local climate conditions perform exceptionally well in rock garden settings. We choose species that naturally grow in rocky or sandy soils to ensure long-term success with minimal intervention.
Ornamental grasses like blue fescue and fountain grass add movement and texture contrast to static stone arrangements. Their deep root systems help stabilize soil while their drought tolerance makes maintenance effortless.
Create Proper Soil Composition
Well-draining soil mix forms the foundation for healthy plant growth in raised rock beds. We combine equal parts quality potting soil, coarse sand, and perlite to create optimal drainage while retaining essential nutrients.
Adding decomposed granite or small gravel improves soil structure and prevents compaction over time. This amendment allows water to flow freely through the growing medium while providing stable root anchoring.
Avoiding heavy clay soils prevents water accumulation that can damage plant roots in confined bed spaces. We test soil drainage by digging small holes and observing how quickly water disappears after rainfall or irrigation.
Incorporating organic compost in small amounts provides nutrients without compromising drainage capabilities. This balance supports plant health while maintaining the fast-draining conditions that rock garden plants require for optimal performance.


Construct a Rock Garden Pathway System

Pathways transform your rock garden from a beautiful display into an interactive industry that invites exploration. We’ll show you how to create functional walkways that complement your garden’s natural aesthetic while providing easy access to every corner of your outdoor space.
Use Stepping Stones for Natural Flow
Stepping stones create an organic pathway that winds naturally through your rock garden industry. Position these flat stones strategically among your existing plants and boulders to avoid root damage while maintaining easy navigation. We recommend spacing stones 18-24 inches apart for comfortable walking stride length.
Natural stone materials like slate, flagstone, or sandstone work best for stepping stone pathways. Choose stones that are at least 2 inches thick to prevent cracking under foot traffic. Place each stone slightly above ground level to ensure proper drainage and stability during wet weather conditions.
Strategic placement techniques help you create visual interest while protecting your garden plants. Arrange stepping stones in gentle curves rather than straight lines to encourage slower movement and better garden appreciation. We suggest testing each stone’s stability before permanent installation to ensure safety for all garden visitors.
Border Pathways with Decorative Rocks
Decorative rock borders define your pathway edges while adding visual appeal to your rock garden design. Select rocks in complementary colors and varying sizes to create natural looking boundaries. We recommend using stones ranging from 3-8 inches in diameter for optimal visual impact and practical functionality.
Color coordination enhances your garden’s overall aesthetic when you choose border rocks that complement your existing stone features. Match warm toned pathway borders with sandstone elements or pair cool gray rocks with granite boulders. This creates a cohesive look that ties your entire rock garden industry together seamlessly.
Installation techniques ensure long lasting borders that withstand weather changes and foot traffic. Dig shallow trenches along pathway edges and embed larger rocks partially into the soil for stability. Fill gaps between border stones with smaller pebbles or decomposed granite to prevent weed growth and maintain clean lines.
Integrate Lighting for Evening Appeal
Solar powered pathway lights extend your garden’s beauty into evening hours without increasing electricity costs. Install these lights every 6-8 feet along your rock garden pathways to provide adequate illumination for safe navigation. We recommend choosing warm white LED options that create welcoming ambiance without harsh glare.
Strategic light placement highlights key garden features while ensuring practical pathway visibility. Position lights near stepping stones, pathway curves, and garden focal points like water features or specimen plants. This creates layers of illumination that showcase your rock garden’s best elements after sunset.
Low voltage lighting systems offer more control over your garden’s nighttime atmosphere than solar alternatives. Install transformer based systems with timers and dimmer controls to customize lighting intensity throughout different seasons. We suggest using copper or bronze fixtures that develop natural patina over time to blend seamlessly with your rock garden’s natural materials.


Install a Multi-Level Terraced Rock Garden

Creating a multi-level terraced rock garden transforms sloped or uneven terrain into stunning layered landscapes. We’ll guide you through the essential steps for building visually distinct terraces that combine structural appeal with practical drainage answers.
Plan Each Tier for Visual Interest
Large rocks and boulders form the foundation of our terraced design, serving as anchors that provide structure and prevent soil erosion on slopes. We position these substantial stones first to establish focal points and define each level’s boundaries.
Varying rock shapes, sizes, and colors creates ever-changing visual appeal across different tiers. We incorporate lighter-colored stones to prevent the garden from appearing too heavy or overwhelming. Complementary gravel swaths add order and contrast while creating smooth transitions between terraced levels.
Stone pathways guide movement throughout the multi-level design, connecting each terrace with purpose and structure. We use materials like gravel or concrete to create clear navigation routes that enhance the garden’s accessibility and visual flow.
Select Plants for Each Elevation Level
Each terrace’s elevation creates unique microclimates that influence plant selection and placement strategies. Lower tiers typically retain more moisture, while higher terraces drain quickly and require drought-tolerant species.
Perennials, ornamental grasses, and small shrubs provide year-round interest across different elevation levels. We choose alpine plants that thrive in our exact climate conditions to ensure long-term success and minimal maintenance requirements.
Creeping groundcovers soften harsh rock edges while adding texture and color throughout the terraced design. Seasonal bulbs like narcissus and alliums introduce vibrant color changes, while evergreen dwarf conifers maintain structure during winter months.
Shade-tolerant plants like ferns and hostas work well in lower areas where upper tiers create natural shadows. We strategically place these moisture-loving species in locations that benefit from increased water retention and reduced sun exposure.
Ensure Proper Water Management
Terraced levels naturally control runoff and soil erosion by slowing water movement down slopes and allowing better absorption. We ensure each tier has adequate drainage to prevent waterlogging that can damage plant roots and compromise structural integrity.
Permeable gravel layers prevent water accumulation in individual terraces while maintaining the fast-draining conditions essential for rock garden plants. We avoid heavy clay soils that retain excessive moisture and can cause root rot in drought-adapted species.
Drip irrigation systems provide efficient water delivery to each elevation level without creating runoff or erosion problems. We install these systems to target exact plant zones and maintain consistent moisture levels appropriate for each terrace’s plant selections.
Regular maintenance keeps drainage paths clear and prevents debris buildup that can redirect water flow inappropriately. We check drainage systems seasonally and remove accumulated leaves, sediment, or other materials that might block proper water movement through the terraced structure.


Create Rock Garden Borders and Edging

We’ll transform your rock garden’s perimeter into a polished industry feature that defines space while maintaining natural beauty. Effective borders and edging create visual boundaries that enhance your garden’s overall design cohesion.
Define Garden Boundaries Naturally
Sloped rock gardens maximize natural terrain by layering stones along existing inclines with interspersed plantings for visual appeal. We position larger boulders at the base to anchor the design and create stability for the entire structure. Medium-sized rocks fill transitional spaces while directing water flow away from planted areas. Small stones and pebbles complete the layered effect by filling gaps and creating texture variation.
River rock borders establish flowing boundaries that blend seamlessly with surrounding industry elements. We select smooth, rounded stones in complementary colors to create continuous lines that guide the eye naturally. These borders work exceptionally well for curved garden edges where rigid materials would appear forced or unnatural.
Boulder focal points serve as natural anchors that define larger garden spaces while creating dramatic visual interest. We strategically place these statement pieces at corners or transition points to establish clear boundaries. Single large boulders can define an entire garden section when positioned thoughtfully.
Mix Rock Sizes for Texture Variation
Pebble and boulder combinations create ever-changing visual depth through contrasting textures and proportions. We layer small river pebbles around larger boulder bases to establish smooth transitions between different rock sizes. This technique prevents harsh visual breaks while maintaining each element’s distinct character.
Stacked stone displays add vertical interest and cultural significance through carefully balanced arrangements. We build these features using flat stones of varying sizes to create stable towers that symbolize balance and creativity. Each stack requires a broad base stone with progressively smaller pieces to ensure structural integrity.
Textural layering involves positioning rocks of different surface finishes to create tactile and visual variety. We combine smooth river rocks with rough granite pieces and weathered limestone to establish rich sensory experiences. Angular stones contrast beautifully with rounded specimens when arranged thoughtfully.
Transition Smoothly to Lawn Areas
Pebble pathways connect rock garden borders to lawn spaces through gradual material transitions. We create these walkways using uniform-sized stones that complement both the garden’s rock palette and the lawn’s organic textures. These paths should be wide enough for comfortable walking while maintaining proportional relationships with surrounding features.
Stepping stone connections provide functional access while preserving the garden’s natural aesthetic. We space these elements approximately 18 to 24 inches apart for comfortable stride lengths across different terrain types. Natural stone materials like slate or sandstone work best for their slip resistance and weather durability.
Border grading ensures seamless elevation changes between rock gardens and adjacent lawn areas. We gradually reduce rock sizes as they approach grass edges to prevent abrupt visual transitions. This technique creates gentle slopes that allow lawn maintenance equipment to operate effectively while maintaining design continuity.


Design a Desert-Style Succulent Rock Garden

We’ll create a stunning drought-resistant industry that mimics the rugged beauty of arid environments. This approach combines architectural rocks with heat-loving succulents to achieve a natural, low-maintenance garden that thrives in challenging conditions.
Choose Heat-Tolerant Rock Materials
Selecting light-colored rocks helps keep plant root zones cooler by reflecting sunlight away from the garden. Sandstone, limestone, and granite work exceptionally well for desert-style gardens because they’re durable and complement the natural aesthetic of arid landscapes. We recommend using multiple rock sizes to create visual depth and structural interest throughout your garden.
Large boulders serve as the foundation stones that anchor your design and provide dramatic focal points. These substantial rocks should be positioned first to establish the garden’s basic structure. Medium-sized rocks fill transitional spaces and help direct water flow during occasional rainfall. Small stones and pebbles complete the layered look while supporting soil stability between larger elements.
Heat-reflecting properties of lighter stones prevent root damage during extreme temperatures. Rocks with smooth surfaces work better than rough textures because they shed heat more efficiently. We suggest avoiding dark-colored stones like black lava rock, which absorb and retain excessive heat that can stress your succulent plants.
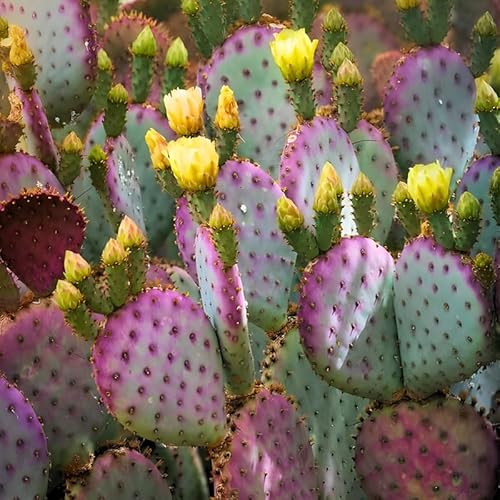
Select Appropriate Succulent Varieties
Drought-tolerant succulents form the backbone of any successful desert rock garden design. Sedum varieties offer excellent ground coverage and produce colorful flowers that attract beneficial pollinators. Echeveria species create beautiful rosette patterns and come in various sizes to fit different garden spaces. Agave plants provide striking architectural elements with their bold, sculptural forms.
African Milk Tree (Euphorbia trigona rubra) thrives in USDA zones 9-11 and adds impressive vertical height to your design. This succulent grows tall with colorful stems and requires minimal water once established. Its unique branching pattern creates interesting shadows and texture contrasts against rock surfaces.
Purple Gem Rockcress (Aubrieta deltoide) serves as vibrant groundcover that flourishes in rocky, harsh conditions. This low-growing plant produces masses of purple flowers that cascade beautifully over rock edges. We recommend planting it in crevices between stones where it can spread naturally and soften hard rock surfaces.
Grouping plants according to their water and sunlight requirements ensures optimal growing conditions. Place sun-loving varieties in exposed areas where they’ll receive direct sunlight for most of the day. Position more sensitive species in partially shaded spots created by larger rocks or taller plants.
Arrange Rocks for Maximum Visual Impact
Begin placement by positioning large boulders in natural-looking groupings rather than straight lines. We suggest using odd numbers of rocks (three or five) to create more visually appealing arrangements. These foundation stones should be buried partially to appear as natural rock outcroppings rather than simply placed on top of soil.
Create a tiered planting system by adding smaller rocks between larger boulders to form raised planting pockets. Fill these spaces with well-draining soil that allows water to move quickly away from plant roots. This layered approach prevents water from pooling around succulent stems where it could cause rot.
Vary rock heights and textures throughout the garden to establish multiple focal points and visual interest. Position taller rocks toward the back of garden beds and shorter ones in front to create depth perception. Mix smooth river rocks with rough, angular stones to add textural contrast that catches light differently throughout the day.
Allow adequate spacing between plants to accommodate their mature size and ensure proper air circulation. Succulents need room to grow without competing for space or creating overly dense plantings that trap moisture. We recommend leaving at least 6-12 inches between smaller plants and 18-24 inches around larger specimens like agaves.


Build a Rock Garden Around Existing Trees

Existing trees present unique opportunities for rock garden design that many homeowners overlook. We can transform these established landscapes into stunning rock gardens by working thoughtfully around mature root systems and natural growing patterns.
Work with Natural Root Systems
Working around existing tree roots requires careful planning to avoid damage while creating beautiful rock garden features. We need to design our layout to accommodate the natural root system spread, which typically extends 1.5 to 3 times beyond the tree’s canopy drip line.
Selecting appropriate soil becomes critical when designing around established trees. We should choose well-draining soil mixes that complement both the tree’s health requirements and our rock garden plants’ needs. Sandy loam mixed with organic compost provides excellent drainage while supporting tree root health.
Planning the placement of larger rocks requires understanding root zones and seasonal growth patterns. We can position substantial rocks as focal points around trees by placing them in areas where root density is naturally lower. Strategic rock placement creates visual harmony without competing with the tree’s natural beauty or restricting future root expansion.
Create Complementary Plant Groupings
Creating plant groupings that enhance rather than compete with existing trees involves selecting species with compatible growing requirements. We recommend mixing perennials with succulents and cacti to establish diverse, low-maintenance plant communities that thrive in tree-filtered light conditions.
Incorporating ornamental grasses adds vertical height and textural contrast to tree-based rock gardens. Grasses like fountain grass and blue fescue provide movement and seasonal interest while requiring minimal water once established. These varieties complement the sturdy presence of mature trees without overwhelming the industry.
Choosing plants for seasonal interest ensures year-round appeal in our tree-integrated rock gardens. We can select spring bulbs like crocuses and daffodils, summer perennials such as black-eyed Susans, and fall-flowering asters to create continuous blooming cycles. Evergreen groundcovers like creeping thyme and juniper maintain visual interest during winter months.
Use Rocks to Prevent Soil Erosion
Using rocks strategically prevents soil erosion around tree bases while creating attractive landscaping features. We can create terraced systems on slopes using rocks of varying sizes to slow water runoff and protect valuable topsoil from washing away during heavy rains.
Establishing a gravel base under larger rocks improves drainage and provides long-term stability for our rock garden structure. A 2-3 inch layer of crushed gravel or decomposed granite creates proper foundation support while preventing rocks from settling unevenly over time.
Placing boulders strategically helps define garden boundaries and stabilize surrounding soil. We position these larger stones to direct water flow away from tree trunks and toward designated drainage areas. Boulder placement also creates natural seating areas and focal points that enhance the garden’s functionality and visual appeal.

Incorporate Seasonal Color with Alpine Plants

Alpine plants transform rock gardens into vibrant displays that change throughout the seasons. We’ll explore how to create year-round interest while protecting delicate species through strategic design choices.
Select Plants for Year-Round Interest
Combine evergreen groundcovers with seasonal bloomers to ensure your rock garden remains attractive throughout all four seasons. Creeping thyme retains its foliage during winter months while providing purple flowers in summer. Sedums offer succulent texture year-round and burst into colorful blooms during fall months.
Choose dwarf conifers as structural anchors that provide consistent color and form when other plants go dormant. Dwarf junipers add blue-green hues during colder months and maintain their compact shape regardless of weather conditions. These evergreen specimens create visual stability while alpine perennials cycle through their growing seasons.
Layer different textures and bloom times to create continuous seasonal transitions in your rock garden design. Saxifrages produce delicate spring flowers followed by creeping phlox’s summer cascade of blooms. Certain ferns add soft green textures that contrast beautifully with the rigid forms of rocks and conifers.
Mix flowering perennials with foliage plants to achieve balanced visual interest that extends beyond blooming periods. Alpine plants naturally adapt to rocky, well-drained soils and thrive in harsh mountain-like conditions. Their compact growth habits prevent soil erosion while maintaining attractive appearances during dormant seasons.
Position Rocks to Protect Delicate Species
Create microclimates using larger boulders as natural barriers that shield sensitive alpine plants from harsh winds and temperature extremes. Strategic rock placement mimics natural mountain formations where these plants originally evolved. Large stones absorb heat during the day and release it slowly at night, moderating temperature fluctuations around plant root zones.
Use medium-sized rocks to direct water flow away from plants that prefer drier conditions while channeling moisture toward species that need more hydration. This selective water management prevents root rot in drought-tolerant alpines while ensuring adequate moisture for plants with higher water requirements.
Place smaller stones around plant bases to retain soil moisture during hot summer days and regulate ground temperature throughout growing seasons. These finishing stones also prevent soil erosion during heavy rains while creating attractive transitions between different plant groupings.
Arrange rocks to provide wind protection for newly planted or particularly delicate alpine species during their establishment periods. Natural rock formations create pockets of calmer air that allow fragile stems and leaves to develop without constant buffeting from strong winds.
Plan for Seasonal Maintenance Needs
Spring maintenance focuses on debris removal and dividing overcrowded plant colonies that have expanded beyond their allocated spaces. We remove winter’s accumulated leaves and dead plant material that could harbor pests or diseases. Pruning back damaged growth encourages fresh spring development in perennial alpines.
Summer care involves monitoring for pests and providing supplemental watering during extended dry periods when even drought-tolerant plants show stress signs. Regular inspection catches problems early before they spread throughout the rock garden. Deadheading spent flowers encourages continued blooming in many alpine species.
Fall preparation includes strategic mulching around less hardy plants to protect root systems during winter freezing cycles. We avoid heavy mulching that retains excess moisture, instead using gravel or stone chips that provide insulation while maintaining proper drainage. This seasonal protection ensures plant survival through harsh winter conditions.
Winter planning involves assessing plant performance and making notes about which species thrived or struggled in their current locations. We plan any necessary relocations or replacements for the following growing season. Though rock gardens require minimal winter intervention, occasional snow removal from evergreen branches prevents breakage from heavy loads.
Add Decorative Elements and Garden Art

Decorative elements and garden art transform functional rock gardens into captivating outdoor showcases. Strategic placement of artistic features enhances the natural beauty while creating visual interest throughout the space.
Choose Weather-Resistant Materials
Selecting durable materials ensures our garden art withstands harsh weather conditions year after year. Rocks and gravel provide ideal foundations since they’re naturally low maintenance and resist extreme temperature fluctuations, making them perfect for long-term installations.
Metal art pieces offer exceptional durability when crafted from weather-resistant materials like powder-coated steel or aluminum. These sculptures maintain their appearance through rain, snow, and intense sunlight without requiring frequent maintenance or replacement.
Stone sculptures blend seamlessly with rock garden environments while providing permanent artistic elements. Natural stone materials like granite, limestone, and sandstone develop attractive patinas over time, adding character to our decorative installations.
Balance Art with Natural Elements
Creating harmony between artistic features and natural components requires thoughtful placement and proportion. Zen garden elements like stacked stones symbolize stability and creativity while maintaining the garden’s peaceful atmosphere through minimalist design principles.
Abstract stone sculptures work best when they complement rather than compete with surrounding plants and rock formations. We’ll position these pieces to create visual dialogue between manufactured art and natural beauty, allowing each element to enhance the other’s appeal.
Rustic log borders provide woodland charm while defining garden boundaries in an organic way. These natural elements bridge the gap between artistic installations and the surrounding industry, creating cohesive design flow throughout the space.
Create Focal Points Throughout the Space
Large boulders serve as striking focal points that anchor garden spaces and provide visual weight to our design. Positioning these substantial stones strategically creates natural gathering points where visitors pause to appreciate surrounding artistic elements.
Water features like waterfalls or fountains enhance the garden’s tranquility while creating sensory experiences beyond visual appeal. The sound of moving water draws attention to exact areas while providing backdrop music for our outdoor art gallery.
Raised rock beds add dimensional depth and create elevated platforms for showcasing smaller decorative pieces. These structures allow us to display garden art at varying heights, ensuring visual interest from multiple viewing angles throughout the industry.

Conclusion
Rock garden landscaping offers endless possibilities for transforming challenging outdoor spaces into stunning low-maintenance retreats. We’ve explored how these versatile designs can adapt to any terrain while providing year-round beauty with minimal upkeep.
Whether you’re drawn to serene Japanese Zen gardens or vibrant desert-style succulent displays, the key lies in thoughtful planning and proper material selection. Each approach we’ve discussed combines functionality with visual appeal to create outdoor spaces that truly enhance your property.
Remember that successful rock gardens aren’t just about placing stones randomly—they’re about creating harmony between hardscape elements and carefully chosen plants. With the techniques and ideas we’ve shared, you’re well-equipped to design a rock garden that reflects your personal style while thriving in your exact climate and conditions.
Start small, experiment with different combinations, and watch your rock garden evolve into a captivating industry feature that brings lasting enjoyment to your outdoor living space.
Frequently Asked Questions
What is a rock garden and why should I consider creating one?
A rock garden combines stones with carefully selected plants to create visually appealing landscapes. It’s an excellent solution for challenging outdoor spaces like slopes or rocky patches. Rock gardens offer low-maintenance beauty, superior drainage, and can transform difficult terrain into stunning focal points. They’re perfect for anyone wanting a sustainable, attractive garden regardless of gardening experience.
How do I create an authentic Japanese Zen rock garden?
Start with fine white sand or decomposed granite for proper drainage and authentic appearance. Use odd-numbered groupings of naturally weathered stones placed asymmetrically for balance. Create raking patterns to symbolize water movement and maintain color consistency. Add minimalist plant accents like single specimen plants or bamboo screening to enhance the peaceful, contemplative atmosphere.
What materials do I need for a cascading rock waterfall feature?
Select natural stones like limestone and granite for durability and visual appeal. Use large boulders for structure, medium-sized rocks to direct water flow, and small pebbles for finishing. Install submersible pumps and filtration systems for proper water circulation. Surround with moisture-loving plants and succulents to create a naturalistic environment.
How do I build raised rock garden beds for better drainage?
Place large boulders as the foundation, then fill gaps with smaller stones to direct water flow. Create proper soil composition using potting soil, coarse sand, and perlite for optimal drainage. Avoid heavy clay soils. Plant drought-resistant species like succulents and native plants that thrive in well-draining conditions.
What’s the best way to design rock garden pathways?
Use natural stepping stones made from slate or sandstone, placing them organically throughout the garden. Create decorative rock borders to define edges and enhance visual appeal. Integrate solar-powered or low-voltage lighting to highlight key features and ensure safe evening navigation while showcasing the garden’s beauty after sunset.
How do I create multi-level terraced rock gardens on slopes?
Use large rocks and boulders as anchors for each tier, varying rock shapes, sizes, and colors for visual interest. Build stone pathways for accessibility and select plants based on each elevation’s unique microclimate. Implement proper drainage strategies and regular maintenance to keep water flow paths clear and ensure structural longevity.
What plants work best in desert-style succulent rock gardens?
Choose drought-tolerant varieties like Sedum, Echeveria, and Agave that thrive in arid conditions. Group plants based on their water and sunlight needs, creating a tiered planting system. Use heat-tolerant rocks like light-colored sandstone, limestone, and granite to keep root zones cooler while achieving both aesthetic appeal and functional drainage.
How can I add decorative elements to my rock garden?
Select weather-resistant materials like metal sculptures and stone pieces for durability. Balance artistic features with natural elements through thoughtful placement. Use large boulders and water features as focal points to enhance sensory experience. Create raised rock beds to showcase smaller decorative pieces, ensuring visual interest from multiple viewing angles.