Creating a warm, inviting bathroom space is a desire many homeowners share. There’s something special about the way natural materials evoke a sense of comfort and tranquility, making your daily routine feel like a retreat. This passion led me to compile this post filled with 12 wood tile shower ideas that can transform your bathroom into a rustic oasis. If you’re longing to bring nature indoors and infuse your space with a cozy vibe, you’re in the right place.
If you’re someone who appreciates rustic bathroom design and loves the beauty of wood-inspired tiles, you’ll find plenty of inspiration here. Whether you’re upgrading your current shower or planning a complete renovation, these ideas will guide you through various styles, patterns, and color palettes that resonate warmth and authenticity. From classic cedar to reclaimed wood, these designs not only enhance aesthetics but also create a welcoming atmosphere that invites relaxation.
As you dive into this post, you’ll discover creative ways to incorporate wood tile into your shower space. These ideas are not just visually appealing; they come with practical tips for renovation and styling to help you achieve that warm, natural feel you crave. So, let’s explore these wood tile shower ideas that can turn your bathroom into a serene getaway right at home.
Key Takeaways
– Diverse Styles: Explore a range of wood tile options including classic cedar, herringbone patterns, and reclaimed wood, allowing you to choose a design that suits your taste.
– Warm Color Palettes: Implement warm color schemes with wood tiles to create a comforting and inviting shower environment.
– Natural Materials: Understand the benefits of using natural materials to enhance the overall aesthetic and feel of your rustic bathroom design.
– Shower Renovation Tips: Get practical advice on how to successfully incorporate wood tile into your shower renovation for a stunning result.
– Creative Accents: Discover how to use decorative inlays or textured tiles to add unique touches to your wood tile shower.
How To Choose The Right Wood Tile Shower Design
When it comes to selecting wood tile for your shower, there are several factors to consider to ensure you make the best choice.
1. Style Preference: Determine your overall bathroom theme. Do you lean toward a rustic farmhouse look or something more modern? Your style preference will guide your tile selection.
2. Tile Material: Choose between ceramic or porcelain wood-inspired tiles. These materials are durable and water-resistant, making them suitable for wet areas like showers.
3. Size and Shape: Consider the size of your tiles. Larger tiles can make a small shower feel roomier, while smaller tiles offer more design versatility. Shapes like rectangular or square can create different visual effects.
4. Color Palette: Decide on a warm color palette that complements your bathroom’s existing decor. Light, neutral wood tones can create a calm space, while darker shades add richness.
5. Texture and Finish: Look for tiles with a textured surface to enhance grip and safety in your shower. A matte finish can also offer a more natural look compared to glossy tiles.
Pro Tip: Always take home a few sample tiles to see how they look in your space under different lighting conditions before making your final decision.
How To Install Wood Tile in Your Shower
Installing wood tile in your shower can be a rewarding DIY project if you have the right tools and preparation.
Tools You’ll Need:
– Tile cutter
– Thin-set mortar
– Notched trowel
– Grout
– Level
– Spacers
Step 1: Measure & Prep
✔ Measure the shower area to determine how many tiles you need.
✔ Clean the surface where the tiles will be installed to ensure proper adhesion.
Step 2: Dry Lay Tiles
✔ Lay out the tiles in your desired pattern without adhesive to see how they fit.
✔ Adjust as needed for a balanced look before final installation.
Step 3: Apply Mortar
✔ Mix and spread thin-set mortar on the wall using a notched trowel.
✔ Only apply enough mortar for a few tiles to prevent it from drying out.
Step 4: Install Tiles
✔ Press tiles firmly into the mortar, using spacers for even spacing.
✔ Ensure each tile is level by checking with a level as you go.
Step 5: Grouting
✔ Once the mortar has dried, remove spacers and fill the gaps with grout.
✔ Wipe excess grout off the tiles with a damp sponge.
Step 6: Seal the Tiles
✔ Allow the grout to cure, then apply a sealer to protect your wood tiles from moisture.
⏱ Time: ~4-6 hours (may vary based on size and complexity) | 💡 Tip: Enlist a friend to help with the tile laying for a quicker process!
Buying Guide for Wood Tiles
When choosing wood tiles for your shower, having a clear understanding of your options can make the process smoother. Here’s a quick buying guide to help you navigate your choices.
Types of Wood Tiles:
| Type | Description |
|—————-|—————————————|
| Ceramic | Durable, water-resistant, and easy to clean. |
| Porcelain | Slightly denser than ceramic, offers better moisture resistance and durability. |
| Vinyl | Affordable and easy to install but less authentic in appearance. |
Key Features to Check:
– Water Resistance: Ensure the tiles have a water-resistant rating suitable for shower areas.
– Slip Resistance: Look for tiles with a textured surface or specific ratings for slip resistance.
– Ease of Maintenance: Some tiles require more upkeep than others; consider your willingness to maintain them.
Material Comparison:
– Ceramic vs. Porcelain: While both are suitable for wet areas, porcelain tiles tend to be less porous than ceramic, making them a better option for showers.
– Natural Wood vs. Tile: Solid wood is beautiful but not practical for wet areas. Opt for wood-inspired tiles for durability.
Extra Considerations:
– Color Matching: Ensure the tiles complement your existing bathroom color scheme.
– Budget: Set a budget before shopping to narrow down your options.
– Installation Method: Decide if you’ll DIY or hire a professional for installation.
Top Recommendations:
🏆 Best Overall: High-Quality Porcelain Tiles
🥈 Best Budget: Ceramic Wood Tiles
🥉 Best for Unique Design: Reclaimed Wood Tiles
Final Tip: Always request samples before purchasing to see how the tiles look in your space and under your lighting.
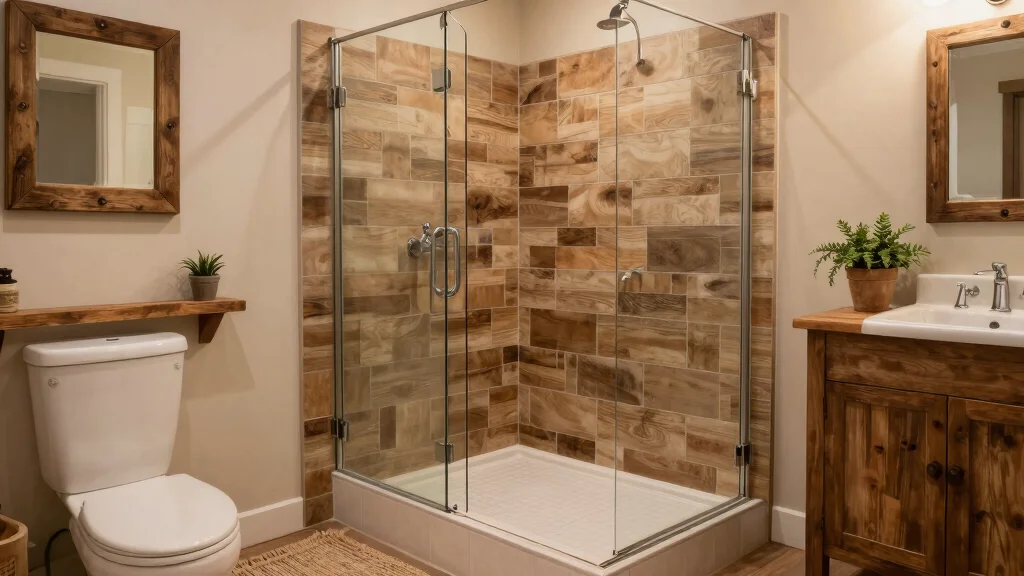
1. Classic Cedar Wood Tile Shower

Cedar wood tiles bring an unmatched rustic warmth to your shower space. The rich, earthy tones and delightful aroma create an inviting atmosphere, making every shower feel like a retreat. Imagine pairing these tiles with vintage brass fixtures and a natural stone floor to achieve a stunning contrast that exudes charm and sophistication.
To implement this look, choose tiles that complement your existing décor, focusing on deep browns and warm undertones. For a budget-friendly option, consider alternative materials that mimic the look of cedar while remaining moisture-resistant.
Consider these elements to maximize this palette’s potential:
– Pair cedar tiles with vintage brass fixtures for added warmth.
– Install a natural stone floor to enhance rustic appeal.
– Use wood accents like a bench or ladder for storage.
This combination not only elevates your bathroom’s aesthetic but also ensures durability, bringing a cozy yet refined vibe to your daily rituals.
2. Whitewashed Wood Tile Shower

For a fresh and airy ambiance, whitewashed wood tiles are an excellent choice. This design strikes a balance between rustic charm and modern elegance, creating a serene space perfect for relaxation. The soft white tones open up smaller bathrooms, giving them a larger feel while maintaining warmth through textured elements.
To bring this look to life, consider light fixtures with rustic details, such as wrought iron or matte black finishes. You can also mix in budget-friendly accessories like cotton towels or linen shower curtains to keep the overall vibe cohesive and inviting.
Consider these elements to enhance your design:
– Mix whitewashed wood tiles with smooth natural stones for contrast.
– Choose rustic lighting to highlight the farmhouse charm.
– Incorporate natural fabrics for a touch of comfort.
This approach creates a peaceful retreat, perfect for unwinding after a long day.
Fun fact: whitewashed wood tile showers can visually expand a small bathroom by up to 20%. Pair soft whites with rustic fixtures—wrought iron or matte black—to keep the space warm without losing brightness. These wood tile shower ideas stay practical, affordable, and beautiful.
3. Herringbone Pattern Wood Tiles

A herringbone pattern in wood tiles introduces sophistication and visual interest to your shower. This timeless design not only enhances the rustic vibe but also creates a sense of movement, drawing the eye upward and around the space. Opt for warm wooden tones to maintain a natural and inviting feel.
For practical implementation, consider using this pattern on a focal wall to create a stunning backdrop. Pair it with fixtures in matte black or brushed nickel for a modern touch, and don’t forget to add a bit of greenery for a refreshing element.
Enhance your shower’s aesthetic with these tips:
– Create a focal wall using herringbone tiles for dramatic effect.
– Choose complementary fixtures in sleek finishes.
– Add small plants to soften the lines and bring life to the space.
This design not only modernizes traditional tile layouts but also ensures a cozy, welcoming atmosphere.
@media (max-width: 600px) {
.visual-quiz-iframe { min-height: 995px !important; height: 1100px !important; }
}
4. Reclaimed Wood Tile Shower

Reclaimed wood tiles offer a sustainable and character-rich option for your shower. These tiles bring unique textures and colors that tell a story, creating a warm and inviting oasis. Pair them with natural stone or cement flooring to achieve an organic and cohesive look.
To incorporate reclaimed wood tiles, look for pieces with visible knots and grain patterns that add depth. Consider eco-friendly fixtures like low-flow faucets to complement your sustainable choice and enhance the overall design.
Utilize these ideas to enhance your shower experience:
– Choose reclaimed tiles with distinctive finishes for added character.
– Opt for eco-friendly fixtures to support sustainability.
– Complement with natural elements like wood shelves for functionality.
This approach creates a unique statement while being gentle on the environment.
5. Dark Walnut Wood Tile Shower

Dark walnut wood tiles bring a dramatic flair to your bathroom, enveloping the space in richness and elegance. The deep hues create a luxurious environment, making your shower feel like a cozy sanctuary. Pair these tiles with lighter fixtures to maintain balance and visual interest.
For a modern enhancement, consider a glass shower door that highlights the beauty of the wood. Incorporate soft lighting to bring out the depth of the walnut while using natural textures like woven rugs to add warmth.
Elevate your design with these practical tips:
– Contrast dark walnut with light accessories for a bright pop.
– Incorporate warm lighting to accentuate the wood’s richness.
– Use natural textures like bamboo mats for comfort.
This style ensures your bathroom remains both sophisticated and inviting.
6. Textured Wood Tile with Pebble Floor

Combining textured wood tiles with a pebble floor creates a spa-like experience in your shower. This unique pairing offers a delightful contrast underfoot while enhancing the natural aesthetic of the space. Opt for earthy tones in both wood and pebble selections to maintain a cohesive look.
To take full advantage of this combination, consider layering different shades of wood for added depth and interest. Ensure your shower has ample natural light to showcase the textures, and choose bath products in natural materials to keep the theme consistent.
Consider these design elements for a stunning outcome:
– Create layers with various wood shades for depth.
– Ensure good lighting to highlight the textures.
– Accessorize with natural materials to maintain the theme.
This combination not only pleases the eye but also provides a luxurious feel for your daily showers.
Fun fact: Textured wood tile with a pebble floor can visually expand a shower by up to 25% thanks to the contrast in texture. Layer two or three wood tones to boost depth, and brighten the space with ample natural light.
7. Vertical Wood Tiles for Height

Vertical wood tiles can create an illusion of height in your shower, making it feel more spacious and open. This design trick draws the eye upward, enhancing the overall perception of your bathroom’s size. Pair these tiles with a small shower shelf for added convenience and storage.
Choose lighter shades to amplify the feeling of openness, and consider glass accents like a shower door that complements the vertical lines beautifully. Keep accessories minimalistic to maintain a modern and uncluttered look.
Implement these ideas to maximize the effect:
– Choose bright colors to enhance spaciousness.
– Add glass accents for a sleek touch.
– Use minimalistic accessories for a clean design.
This approach works wonders in smaller bathrooms, creating a cozy yet expansive atmosphere.
8. Mosaic Wood Tile Shower

Mosaic wood tiles add artistic flair to your shower, allowing for playful patterns and vibrant textures. This design encourages creativity, making your shower a unique expression of style. Choose complementary colors that resonate with the overall bathroom decor for a cohesive look.
To fully realize this aesthetic, consider mixing different shapes and sizes of tiles for an eclectic feel. Balance the colors with fixtures and accessories to maintain harmony, and incorporate layered lighting to highlight the mosaic’s beauty.
Enhance your shower’s individuality with these ideas:
– Mix patterns for a fun, eclectic vibe.
– Ensure colors harmonize with fixtures and accessories.
– Use layered lighting to create dramatic effects.
This design choice adds a personal touch, ensuring your shower reflects your unique style.
9. Open Concept Wood Tile Shower

An open concept shower design using wood tiles provides a seamless transition from the shower area to the rest of the bathroom. This style enhances flow and creates an illusion of larger space. Utilize wood tiles that match your bathroom flooring for a cohesive and integrated look.
For added functionality, consider a glass partition that maintains sightlines while providing some separation. Ensure plenty of natural light through windows or skylights to keep the space bright and inviting, and incorporate decorative elements like plants to enhance the natural theme.
Implement these features for a stunning result:
– Consider a glass partition to separate without obstructing views.
– Ensure natural light is abundant for brightness.
– Use decorative elements like plants to maintain the theme.
This design not only looks modern but also creates a serene, spa-like atmosphere.
10. Rustic Beam Accents with Wood Tile Shower

Rustic beam accents can elevate your wood tile shower, creating a cozy cabin-like atmosphere. Exposed wooden beams add depth and character, while pairing them with complementary wood tiles ensures a harmonious look. This combination enhances the warmth and inviting nature of the space.
Focus on natural colors that echo the outdoors, and consider functional lighting that mirrors the rustic theme. Cozy accessories like fluffy towels and natural wood bath trays will add both functionality and warmth to your shower experience.
Bring these ideas to life for a truly inviting retreat:
– Stick to earthy tones that reflect nature.
– Use functional lighting that complements the rustic style.
– Add cozy accessories for warmth and usability.
This design creates a comforting escape that invites relaxation and tranquility.
11. Warm Color Palette with Wood Tiles

In designing your wood tile shower, consider a warm color palette that enhances the inviting atmosphere. Shades of beige, tan, and soft browns create a cohesive and comforting feel. Pair these tiles with gold or brass fixtures for a touch of sophistication that ties the look together.
Mix textures by combining smooth metal fixtures with the tactile quality of wooden tiles. Add soothing accessories in soft, warm fabrics to maintain the overall cozy vibe, and incorporate natural elements like wood or stone decor to emphasize the earthy theme.
Utilize these elements for a harmonious design:
– Combine smooth metals with textured wooden tiles for contrast.
– Use soft fabrics for towels and curtains to enhance warmth.
– Incorporate natural decor to maintain an earthy feel.
This approach creates a warm sanctuary where you can unwind and rejuvenate.
12. Decorative Inlays with Wood Tiles

Consider incorporating decorative inlays with your wood tiles for a truly unique shower design. This artistic touch adds personalization and depth, transforming a simple shower into a stunning focal point. Choose contrasting colors or materials for the inlays to make a bold statement in your bathroom.
Before installation, sketch out your design ideas to visualize the final look. Use high-quality materials to ensure both longevity and aesthetic appeal, and seek professional advice if needed to achieve a flawless finish.
Bring your vision to life with these tips:
– Plan your design carefully before installation for best results.
– Use high-quality materials for durability and beauty.
– Consult professionals for expert advice on execution.
Decorative inlays enhance your shower’s artistic flair, elevating it from ordinary to extraordinary.
Fun fact: decorative inlays with wood tiles are a standout in wood tile shower ideas, adding depth that can read up to 30% larger in photos. Sketch your design first, choose contrasting colors, and use high-quality materials to create a personal focal point.
@media (max-width: 600px) {
.normal-quiz-iframe { min-height: 570px !important; height: 570px !important; }
}
Conclusion

These 12 wood tile shower ideas offer a variety of options for infusing warmth and rustic charm into your bathroom.
From classic cedar to modern mosaics, there’s a style for every preference. Embracing natural materials in your shower design not only enhances aesthetics but also provides a calming atmosphere. Consider these ideas for your next renovation project to create a cozy sanctuary in your home.
Note: We aim to provide accurate product links, but some may occasionally expire or become unavailable. If this happens, please search directly on Amazon for the product or a suitable alternative.
This post contains Amazon affiliate links, meaning we may earn a small commission if you purchase through our links, at no extra cost to you.
Frequently Asked Questions
How can I use wood tile shower ideas to create a warm natural feel in a rustic farmhouse bathroom?
Start with wood-inspired tiles in porcelain or ceramic to capture the look without the upkeep of real wood. Pair them with a warm color palette—think creamy beiges, sand, and soft taupe—to evoke a cozy, natural vibe. Introduce natural materials like stone accents, a live-edge shelf, or a wicker basket to reinforce the rustic bathroom design. For layout, run planks horizontally to widen the shower or stack them as a feature panel for visual interest. Choose a grout color in a warm tone to blend seams and highlight the grain. Finally, balance the space with matte metal fixtures and soft lighting to complete the warm natural feel.
Practical shower renovation tips include ensuring a solid waterproofing system, using a cement backer board, and applying a quality sealant to protect the surface over time.
Are wood tile showers waterproof and durable enough for daily use?
Yes. With the right installation, wood tile ideas can be both waterproof and durable. Start with a reliable waterproofing system—cement backer board beneath a waterproof membrane, plus grout or sealant rated for moisture. Choose wood-inspired tiles made of porcelain or ceramic for better water resistance than real wood. Use a non-slip finish and a grout color that hides moisture marks. Regular cleaning and periodic re-sealing will extend life. If in doubt, follow professional shower renovation tips from a qualified installer to ensure lasting performance.
What practical layout and color tips should I use when applying wood-inspired tiles in a rustic bathroom design?
Practical tips start with layout: place longer planks horizontally to widen the shower space, or create a striking vertical accent wall to mimic timber. For color, stick to a warm palette—creams, beiges, taupes, and browns—and use a grout shade that blends or softly contrasts with the tile. Mixing textures, like a stone niche or wood vanity, enhances the rustic bathroom design vibe while keeping natural materials in view. Finally, pick lighting that bathes the tiles in warmth and complements the wood grain without washing it out.
How do I maintain a wood tile shower to preserve its warm, natural look over time?
Maintenance is key to longevity. Clean with a gentle, pH-balanced cleaner and avoid harsh chemicals that can stain or degrade grout. Rinse and dry surfaces after showers to prevent mineral buildup on wood-inspired tiles. Re-seal the grout and tile periodically according to product guidelines, especially in a high-moisture space. Use mats or rugs that won’t trap moisture, and fix any sealant gaps promptly to keep your rustic bathroom design looking fresh year after year.
What common mistakes should I avoid when installing wood tile showers?
Common mistakes include using real wood in a wet environment, skipping proper waterproofing, and choosing inadequate backer boards. Avoid mismatched planks or too-tight grout lines that trap moisture. Don’t neglect ventilation—humidity accelerates wear on a rustic bathroom design. Before you start, plan the substrate, waterproofing layer, tile layout, and expansion joints—this is where good shower renovation tips pay off and save you headaches later.
Related Topics
home decor
rustic bathroom
wood tile shower
natural materials
shower renovation
warm color palette
farmhouse style
DIY bathroom
bathroom ideas
easy updates
modern rustic
wood-inspired tiles