Command Strips won’t damage your walls if you follow the rules. Clean with rubbing alcohol, wait 28 days after painting, and respect weight limits—standard strips hold 1 pound, heavy-duty versions go up to 9 pounds. Remove by pulling straight down slowly, applying heat if needed. The real damage happens when you ignore these steps or use them on rough surfaces like textured wallpaper or brick. Stick with smooth painted walls, and you’re golden. There’s way more strategy involved than most people realize.
Do Command Strips Damage Walls?
Command Strips are genuinely designed to be gentler on your walls than traditional nails or screws, and I’m genuinely excited to tell you why they work so well. When you remove them correctly by pulling straight down, they minimize paint damage and leave virtually no residue behind. I’ve seen countless removals result in zero wall evidence!
However, I’ll be honest—misuse happens. If you apply strips to rough wallpaper, brick, or unfinished plaster, you risk peeling paint. That’s why surface preparation matters tremendously. Clean, smooth surfaces are your best friends here. Avoid damp or dirty walls entirely.
The magic? Following weight limits and using proper removal techniques prevents nearly all damage. Command strips damage walls only when we skip these crucial steps. Trust me, doing it right transforms your entire experience.
Why Command Strips Beat Nails and Anchors

Adhesive strips work better than traditional fasteners because they skip the whole hole-making problem entirely. I’ve learned that peel-and-stick adhesive releases cleanly with a downward pull, avoiding the punctures nails create or the anchor holes that demand spackle repairs.
| Method | Wall Damage | Removal Ease |
|---|---|---|
| Nails | Permanent holes | Leaves marks |
| Anchors | Large holes | Difficult removal |
| Command Strips | Minimal damage | Clean peeling |
When you respect weight limits for your strip size, you’re setting yourself up for success. I simply clean my wall surface beforehand, ensuring it’s dry and smooth. The peel-and-stick design means safe removal becomes straightforward—no jackhammering your wall back to square one. You’re joining thousands who’ve ditched the damage cycle entirely.
Clean and Prepare Your Wall Properly
How’s your wall looking right now? Before you stick anything on it, let’s talk surface preparation—because this step makes all the difference. I wipe my walls with isopropyl alcohol and let them dry completely. This removes dust, oils, and residue that’ll sabotage your adhesion strength.
For painted walls, here’s the thing: wait at least 28 days after painting. I know that’s tough when you’re excited, but fresh paint won’t bond properly with Command Strips.
Skip sprays and wipes—they leave gunk behind. Isopropyl alcohol dries clean and preps your clean wall perfectly. Smooth surfaces grip best. If your wall’s rough or slippery, adhesion suffers. Proper surface preparation takes minutes but protects your walls and maximizes your strips’ holding power. You’ve got this!
Wait 28 Days After Painting Before Hanging

Now that your wall’s prepped and squeaky clean, timing becomes your next power move—and I’m not exaggerating. You’ve got to wait a full 28 days after painting before you hang Command hooks. Here’s why this waiting period matters:
- Fresh paint needs curing time – Paint continues hardening for nearly a month, and Command strips need a fully cured surface for a strong adhesive bond
- Prevents paint damage – Hanging too early risks cracking or peeling when you eventually remove the strips
- Ensures removal safety – A properly cured wall means your strips come off cleanly without taking paint with them
- Protects your investment – This simple timeline protects both your painted walls and your Command hooks’ holding power
Mark your calendar. Your patience now means flawless results later.
Apply Command Strips for Maximum Hold
Why does proper installation make all the difference? I’ve learned that nailing the application steps determines whether your Command Strips deliver lasting adhesive hold or let you down. Here’s what I do: I clean the wall thoroughly with isopropyl rubbing alcohol—this removes invisible dust that weakens bonds. Then I separate the strips, pressing the adhesive side firmly onto my object’s back for 30 seconds. Next comes the crucial part: I press the mounted base against the wall for another 30 seconds, applying steady pressure along the entire strip’s length. Then I wait at least one hour before hanging anything. For removal damage-free results, I’ve discovered that patience pays off. By following these exact application steps and allowing proper cure time, I’ve achieved rock-solid holds that protect both my walls and displays beautifully.
Remove Command Strips Without Peeling Paint

Once you’ve nailed the installation and those strips have held strong for weeks or months, you’ll eventually want to take them down—and here’s where I’ve really had to learn the right way.
The secret? Pull that bottom tab straight down slowly and deliberately. This wall-safe removal technique keeps the adhesive strip peeling away from your surface rather than toward you, which makes all the difference for avoiding paint damage.
Here’s my removal process:
- Pull the tab downward and away from the wall in one smooth motion
- Heat stubborn adhesive with a hairdryer to soften it first
- Stretch and release the remaining adhesive gradually
- Use touch-up paint for any minor imperfections
Gentle downward removal minimizes damage and keeps your walls looking pristine. Trust me, this method works.
What to Do If a Strip Snaps During Removal?

If your Command Strip snaps mid-removal, don’t panic—I’ve got you covered! Grip whatever sticky portion remains and keep pulling straight down, which encourages the adhesive to release from the wall instead of tearing the paint. If that stubborn strip still won’t budge, grab a hairdryer, apply gentle heat for 20-30 seconds to soften the glue, and then resume your downward pull with confidence.
Grip Remaining Sticky Portion
Don’t panic when your Command Strip snaps mid-removal—this happens more often than you’d think, and I’m genuinely excited to share how to handle it like a pro.
When your strip breaks, here’s exactly what to do:
- Grip any remaining sticky portion firmly with your fingers or tweezers
- Pull downward slowly to stretch the adhesive up to 30 cm, minimizing damage-free removal
- Hold the wall with your other hand to prevent uneven snapping and wall tearing
- Use a hairdryer on low heat if the adhesive stays strongly adhered after breaking
This technique keeps you in control throughout the process. I’ve found that gentle, deliberate movements work better than forcing it. You’re basically coaxing the Command Strip off rather than wrestling with it, which protects your wall’s finish completely.
Resume Downward Pull Technique
What happens when you’ve got a broken Command Strip dangling from your wall? Don’t panic! Grip that remaining sticky portion firmly and resume your downward pull technique. This removal technique is your guarded tactic against wall damage.
Here’s what I do: I keep pulling straight downward along the wall’s surface, maintaining steady pressure. This guarantees the adhesive residue releases cleanly without peeling paint away with it. The key? Never pull outward or sideways—that’s when disaster strikes.
If resistance builds up, I grab my hairdryer, apply gentle heat for thirty seconds, then continue pulling downward. The warmth softens the adhesive, making removal smoother. You’ll feel the strip release gradually as you work downward, leaving your wall pristine and paint-intact. That’s the satisfaction we’re after!
Apply Heat For Stubborn Adhesion
Sometimes even the steadiest downward pull meets its match—that’s when heat becomes your hidden arsenal. I’ve discovered that applying warmth transforms stubborn adhesive from immovable to manageable. Here’s my proven heat strategy:
- Use a hairdryer on medium heat, holding it 6 inches from the strip for 30 seconds
- A heat gun works faster but requires careful distance to prevent wall damage
- Warm the adhesive thoroughly before attempting removal to loosen its grip
- Resume your downward pull slowly after heating for clean separation
The warmth softens that sticky bond between strip and wall, making removal genuinely easier. I peel from top to bottom using steady, deliberate motions—no rushing. This technique prevents paint tears and residue buildup that’d require touch-up work afterward. You’ve got this!
Can You Reuse Command Strips?

Yes, you can absolutely reuse Command Strips, and I’ve found this capability genuinely useful for renters and anyone who likes to refresh their wall décor without constant replacements. The frame-side piece can stick to a fresh wall-side half, letting you re-hang without ditching everything. Here’s the catch: you’ll want your wall surface cleanliness and dryness down perfectly before attempting this. During removal downward, the adhesive stretches, which honestly reduces reuse potential sometimes. That wall damage risk drops significantly when you pull down instead of outward—it’s a game-changer for preserving both your walls and strips. If your adhesive’s degraded, grab new ones rather than struggling. With careful alignment and proper pressure during re-attachment, you’ll maintain solid holding strength and keep wall damage minimal.
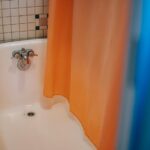
Best Surfaces for Command Strips: and Which to Avoid

I’m genuinely excited to show you which surfaces’ll work brilliantly with Command Strips and which ones’ll leave you frustrated—because honestly, picking the right spot makes all the difference between a successful hang and a disappointing failure. You’ll want smooth, clean surfaces like painted drywall, finished wood, glass, and tile, where the adhesive can grip strongly and securely. But here’s where most people slip up: rough or porous surfaces like textured walls, brick, concrete, wallpaper, and unfinished wood’ll cause your strips to fail because the adhesive can’t create that tight bond you need.
Ideal Mounting Surfaces Work
What makes Command Strips stick so beautifully to some surfaces while completely failing on others? I’ve discovered it’s all about smooth, non-porous finishes that create reliable adhesion strength.
Here’s what works amazingly well:
- Painted walls (wait 28 days after painting for optimal results)
- Finished wood, glass, tile, metal, and plastic surfaces
- Any clean, smooth surface free from texture or debris
Before I apply strips, I clean everything with isopropyl rubbing alcohol and let it dry completely—this maximizes bond strength tremendously. I avoid rough surfaces like wallpaper, brick, textured walls, and unfinished wood because adhesion becomes unpredictable there.
Moisture is my enemy too. Humid or wet areas compromise the entire process. When I match strips to appropriate surfaces and prep properly, they hold beautifully without damaging anything.
Surfaces To Avoid Completely
Not every wall in your dwelling will play nicely with Command Strips, and that’s totally okay—knowing which surfaces to skip saves you frustration and potential damage down the road.
I’ve learned the hard way that certain surfaces just won’t cooperate. Textured walls, wallpaper, brick, concrete, unfinished wood, and plaster are adhesion nightmares. Wet or damp surfaces? Absolutely skip them. These problematic materials either prevent proper bonding or cause the adhesive to fail spectacularly.
| Surface Type | Why Avoid | Risk Level |
|---|---|---|
| Textured walls | Reduces adhesion contact | High |
| Wallpaper | Peels when strip pulls | High |
| Brick/concrete | Too porous, poor grip | High |
| Unfinished wood | No protective coating | Medium |
| Wet surfaces | Compromises bonding completely | Critical |
Trust me—stick with prepared surfaces instead. Your walls will thank you.
Weight Limits and How Long They Last
How much weight can these little adhesive strips actually hold? I’m thrilled to share that Command Strips come in various weight limits designed for different needs:
- Standard strips hold around 450 g (1 lb) each
- Mid-range options support 1.3 kg, 2.2 kg, and 3.6 kg
- Heavy-duty strips reach 5.4 kg, 7.2 kg, and up to 9 kg
Here’s what I’ve learned matters most: respecting weight limits prevents removal damage and keeps walls pristine. Surface suitability is equally crucial—clean, smooth surfaces ensure optimal performance. Don’t skip cure time! I wait about one hour before hanging anything. This patience protects your investment. Ignoring these guidelines risks wall damage and strip failure, which honestly defeats the purpose of using damage-free solutions.
Fix Paint Damage After Removal

Despite your best efforts, sometimes those Command Strips leave behind a small casualty—a patch of peeled paint or a rough spot on your wall. Here’s the good news: you’ve got this! I recommend grabbing matching touch-up paint and a small brush to cover the damaged area. Before painting, carefully inspect for any adhesive residue clinging to the wall. Use your finger or a soft cloth to gently remove it—this step matters because leftover adhesive prevents smooth repainting. Once cleaned, apply your touch-up paint in thin layers, letting each coat dry completely. You’ll feel genuinely proud watching that blemish disappear. The result? A wall that looks untouched, like those strips were never there. That’s the belonging you deserve from removing Command Strips safely.
When Command Strips Won’t Work (and Better Alternatives)

What if you’ve prepped your wall perfectly, followed every instruction, and those Command Strips still won’t stick? Sometimes command strips failure happens because your surface just isn’t compatible. I’ve learned that unsuitable surfaces like brick, textured wallpaper, or rough drywall create real problems. Moisture and humidity also sabotage adhesion, risking wall damage risk when you try removing them.
Command Strips fail on incompatible surfaces like brick and textured wallpaper. Moisture and humidity sabotage adhesion, risking damage during removal.
Here’s what works better for tricky situations:
- Removable mounting putty grips uneven surfaces without adhesive concerns
- Suction cup hooks excel on smooth, non-porous areas like tile
- Small finishing nails create minimal holes compared to strip damage
- Damage-free picture hanging wire distributes weight safely
When alternative mounting methods matter most, you’re protecting your walls while keeping that rental-friendly flexibility. That’s the real win we’re all after!